Insert coil into one of the post holes on the side of the deck. Decide exactly where you will need to make your bend in the leg so that the coil will end up centered over the hole. Remove the coil and use pliers to bend it in the location you picked, making sure it is pointing in the right direction (it should be going parallel to the coil).

What do you need to rebuild a vape atomizer?
Most rebuildable atomizers nowadays come with basic coil building supplies. Wire: any of the vaping wires would do. Fine tip tweezers: to fluff your cotton and place it inside the wick ports Other (optional) accessories: An ohm reader: used to be a thing, but a regulated mod gets the job done A coil jig: it can make your life a little easier
Why rebuild your vape coils?
Rebuilding and wrapping coils offer the user cost savings and control over the vape in a way that pre-made coils just cannot do. My first attempt at vaping came back in 2009 on some of the first cigalikes to ever reach Europe.
How to wrap vape coils?
For more info, watch Rip Trippers tutorial on how to build a parallel coil by hand. For even better results you can use a coil jig: just wrap the first coil using the jig’s guide, and manually wrap the second coil in between the gaps. Wrapping vape coils can appear to be much more difficult than it really is.
How long can you keep vaping with pre-built coils?
For the price of one five-pack of pre-built coils you’ll be able to keep vaping for most of the year.

How do you rebuild a vape coil?
6:458:42The Ultimate Vape Hack!! ReBuild Your Coil Head In ONLY ... - YouTubeYouTubeStart of suggested clipEnd of suggested clipNext step take a pair of wire cutters the wire that's bent to the side in that little groove cutMoreNext step take a pair of wire cutters the wire that's bent to the side in that little groove cut that as flush as you can as close as you can to the coil head to the base that coil.
How do you rewick a vape coil?
3:179:10How to Wick a Vape Coil Properly - A Tutorial on RDA Coil WickingYouTubeStart of suggested clipEnd of suggested clipSo soak it in keep soaking it in. And you want to do that until it takes a while for the juice to goMoreSo soak it in keep soaking it in. And you want to do that until it takes a while for the juice to go all the way into the coil. See how this one's a little bit dry watch how long it.
Can you revive a burnt vape coil?
Can you fix a burnt coil? Though burnt coils are best to be replaced as soon as possible, the good news is that you can get a little extra life from them whilst you wait for your new coils to arrive. First thing's first, remove your coils from your e-cig and let them soak in a bowl of hot water to loosen any residue.
How do you set up a vape coil?
0:451:52Priming a vape coil in 2 minutes - YouTubeYouTubeStart of suggested clipEnd of suggested clipGet your either quid. And add a drop onto each of the liquid inlet holes add a few drops onto theMoreGet your either quid. And add a drop onto each of the liquid inlet holes add a few drops onto the wicking material down the middle hole put your vape coil in your tank fill your tank with the liquid.
Can you clean and reuse vape coils?
Yes, you can clean and reuse vape coils, but this, unfortunately, will not give you that fresh coil vape experience. The average lifespan of a vape coil is between 7-21 days, depending on what coil you are using.
Can you clean a burnt coil?
So, carefully remove the coil from the hot water and submerge it in the cold water. With this, any remaining debris will fall off, and your coil will be clean again. If you have done this and still experience the annoying burnt taste vape, then you can clean it using vinegar or lemon juice in hot water.
Why is my coil burning after 1 day?
Ensure Your Tank Is Properly Filled While this might seem obvious, the first port of call when your coil is burning is to ensure that it is properly saturated with e-liquid. Allowing your tank to run on empty while still vaping will inevitably cause dry burn, which can permanently damage the coil.
Why does my coil taste burnt after 2 days?
It tastes burnt because the wick inside your atomizer coil has dried out and burned up when it was heated. The wick is the part of your vaporizer that soaks up the eliquid from the tank. The wick holds onto this eliquid before it is turned into vapor when the coil heats up.
How do you cure Vapers tongue?
Change the flavour - the simplest solution; swap your vape juice every so often. By simply changing the flavour you vape and returning to it after a couple of weeks, can help fend off vaper's tongue and keep the taste fresh.
How do you break in a new coil?
Here is how to make coils last longer by breaking them in gradually:When you start vaping, set the wattage to the lowest recommended setting.Take a few short vapes to slowly start to break in the coil.Increase the power by 5 watts.Take three normal vapes and increase power by 5 watts.More items...•
How do you build a coil?
6:5711:11COIL BUILDING 101 - HOW TO MAKE VAPE COILS FOR BEGINNERSYouTubeStart of suggested clipEnd of suggested clipIt's gonna get into the cotton. So just make sure you wash your hands before you start building makeMoreIt's gonna get into the cotton. So just make sure you wash your hands before you start building make your point get your coil installed. And now you just pull that cotton.
Can a burnt coil make you sick?
Depending on how bad the coil is burnt, you could end up choking or vomiting immediately. Depending on what kind of coil you are using they can produce some particles that stick to the vapor and end up ingested by the user when they are burned dry. Some have an allergy to these particles being created.
What is a dripping atomizer?
Dripping atomizers differ from other vape atomizers in that you have to physically drip the e-liquid onto a wick in the device. Rebuildable dripping atomizers are meant to be used in non-disposable vaping devices, so that you can continue to get maximum enjoyment from your device without having to replace the entire thing!
What is an RDA atomizer?
What is an RDA? RDA stands for rebuildable dripping atomizer. If you’ll recall, from some earlier vaping 101 blogs, the vape atomizer is the part of the vaporizer that is responsible for heating the e-liquid and turning it into vapour. Dripping atomizers differ from other vape atomizers in that you have to physically drip ...
Can you replace a vape atomizer coil?
Yes. Rebuilding the vape atomizer (replacing the coils and wick) is a fairly simple process, which takes a little bit of practice to get to the point where you feel like you can do it as often as you need to.
Why rebuild coils?
There are four key reasons you might want to start rebuilding stock coils, although the main benefits are encapsulated by the first two. Saving Money: Pre-built coils are expensive. In comparison, a huge spool of kanthal, stainless steel, nickel or titanium is cheap and cotton is even cheaper. For the price of one five-pack ...
How much does it cost to replace a coil?
The only downside is that picking up replacement coils can get expensive very quickly, often costing $2.50 per coil or more. While this isn’t very much per coil, over a year or more of vaping the costs can really mount up. However, there is a solution: rebuilding stock coil heads yourself.
How does a stock coil work?
Stock coil heads ultimately work in a very similar way to RDAs. The two “legs” on the coil are connected up to a positive and a negative contact point on the atomizer head. These are threaded with or surrounded by wick so it can soak up juice and keep you vaping.
What is the main tube of an atomizer?
The main tube is hollow, and has a large chamber for the coil itself to sit in. The two legs of the coil point directly down towards the bottom of the atomizer head, and are trapped by a rubber grommet and a metallic pin.
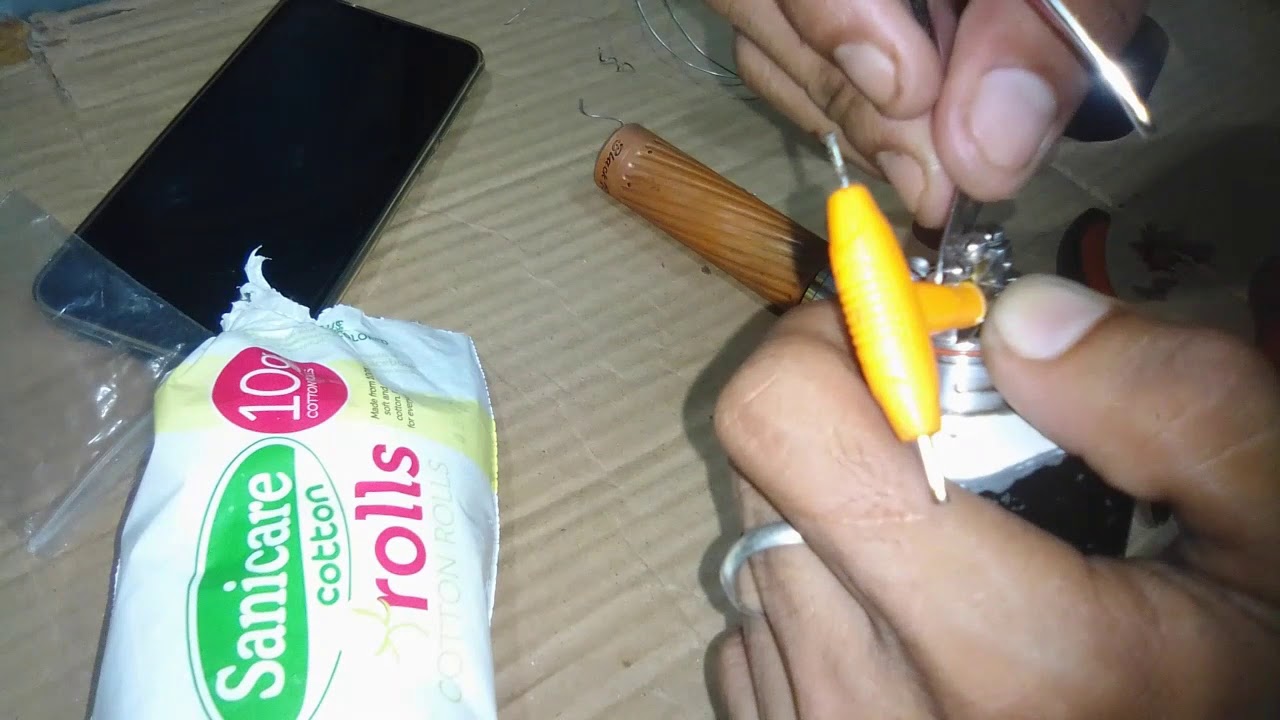
How to wick a coil?
Wicking your coil is the next step. To do this, take a sheet of Japanese organic cotton and place it next to your co il. Cut a strip from it that’s wide enough to cover the length of your coil. As for length, just keep the whole length of the sheet for now. Remove the front and back layers of the cotton so you have two fluffier faces for wicking.
Is vaping cheaper than coils?
However, if you like the convenience of your favorite sub ohm tank but the cost of coils is just getting too much for you, learning to rebuild your own coils can save you tons of money. Vaping is cheap anyway, but you can make it even cheaper.
Do you need to rebuild coil heads?
To rebuild stock coil heads, you need pretty much anything you need for any coil build. If you’re an RDA or RTA user already, you’ll have everything you need. If not, you may have to place an order for some supplies, but what you pick up will last you quite some time.
Where are the airflow valves located on a rebuildable atomizer?
The airflow valves are placed on the base of the rebuildable atomizer. The Airflow are small channels through which air enters the rebuildable atomizer, most of which can be adjusted by means of a rotating ring. These airflow channels serve to:
Why use a dripper atomizer?
The Dripper atomizer is often used to taste a liquid, the advantage is to be able to get an idea in just a few drops, unlike a Tank. Some find it a better way to get cleaner flavors between flavor changes… It’s a matter of taste!
What is the RDA atomizer?
As mentioned earlier there are two main types of atomizer units that can be purchased. These atomizers are the RDA which stands for “Rebuildable Dripping Atomizer ”, and RTA which is a “Rebuildable Tank Atomizer”.
How to save money on vaping?
One of the best ways to save money in vaping is to build your own coils. Rather than buying disposable coil heads every week, you can make your own. It’s a fun hobby that vapers not only take pride in, but get to enjoy the fruits of their labor. The way to get good at it is through practice. Although, it’s perfectly reasonable for first-time ...
How to build a coil for a RDA?
First, examine the deck and see if it is a dual or a single-coil atomizer. Then check the size of the deck and see how large your build can be—you don’t want your coils to touch the top cap as this will cause a sort.
How are micro and macro coils created?
Micro and macro coils are created by taking a single piece of wire and wrapping it around a screwdriver, drill bit, or coil jig. The difference between a micro and a macro coil is the inner diameter of the coil. It’s that simple.
Why do you need to have two coils?
When doing a dual coil build, it’s essential for both coils to be identical in size and form, to ensure that they heat up properly. Dual-coil builds obviously create more vapor than a single coil of the same specs, but require double the power to perform.
What do you use to pinch coils?
Wire: any of the vaping wires would do. Flush cutters: wire cutters that can cut close in small spaces. Ceramic tweezers: to pinch your coils while pulsing. Fine tip tweezers: to fluff your cotton and place it inside the wick ports. Small metal rod: a small screwdriver, or coiling tool.
Who makes coil jigs?
Some of the best-known coil jigs are manufactured by Coil Master, UD, and Kuro Concepts. Wrapping coils using a coil jig is a fairly straightforward process. If you want to learn more, watch Sherlock Hohms’ video where he shows how to easily wrap a 2.5 mm coil using a coil jig.
Can you wrap a vape coil?
While there are many types of vape tools and accessories you can use to wrap a vape coil, it’s best to keep it simple. There are plenty of good coil building kits on the market that supply you with everything you need, but you can also buy these things a la carte, or maybe you even have these supplies on hand already.