Grab the fresh coil out of the box Drip a couple of drops of e-liquid on the wicking holes and inside the coil head Reassemble the vape tank and fill it with your choice of vape juice Screw the tank on your vaping device and set it aside for at least 10 minutes
Full Answer
What is the best way to vape with a mesh coil?
Most coils work best with 70/30 VG/PG juices since most mesh coils are made for DTL vaping. If you have an MTL mesh coil then 50/50 would be best. Take the coil and put a few drops of juice directly onto the cotton inside the coil that is against the coil itself. Let it soak in.
How long should I let my coil Prime before vaping?
Once your coil is properly primed, seal the tank up and fill her up with E Juice. You can vape it right away, but I like to leave it for 5-10 minutes to let the cotton soak up, even more, E Juice.
How to use e juice in a coil?
Slowly drip E Juice through the mesh (at the top) and onto the cotton. Do a few drops, then wait. Check the wicking holes on the side, they should be saturated with juice. If they’re not, keep dripping E Juice until they are. Once your coil is properly primed, seal the tank up and fill her up with E Juice.
How to Prime mesh coils perfectly?
6 Quick Steps To Prime Your Mesh Coils Perfectly 1 Take your new coil out of its pack.. 2 Grab your juice bottle.. Slowly drip E Juice through the mesh (at the top) and onto the cotton. Do a few drops, then... 3 If they’re not, keep dripping E Juice until they are.. Once your coil is properly primed, seal the tank up and fill her... More ...

How do you put a vape coil together?
6:4411:11COIL BUILDING 101 - HOW TO MAKE VAPE COILS FOR BEGINNERSYouTubeStart of suggested clipEnd of suggested clipThe fibers of the cotton are flowing. Okay. So this one you want to eyeball it maybe say rightMoreThe fibers of the cotton are flowing. Okay. So this one you want to eyeball it maybe say right around there you cut it right cut yourself a nice strip. Just like that then you want to take this strip.
How do you rebuild a vape coil?
5:078:42The Ultimate Vape Hack!! ReBuild Your Coil Head In ONLY ... - YouTubeYouTubeStart of suggested clipEnd of suggested clipAnd you bend it bend that mesh in the cotton. Make sure again that mesh is right in the center bendMoreAnd you bend it bend that mesh in the cotton. Make sure again that mesh is right in the center bend that sucker around the rod pinch it in the center pull it pull the slack.
How do you restore a coil?
How to Clean a Burnt CoilSTEP ONE: SOAK YOUR COILS. First thing's first, remove your coils from your e-cig and let them soak in a bowl of hot water to loosen any residue.STEP TWO: CLEANSE YOUR COILS (optional) ... STEP THREE: LEAVE TO AIR DRY. ... STEP FOUR: PRIME THE COILS. ... STEP FIVE: REPLACE.
Can I rebuild vape coils?
It's actually disarmingly simple to rebuild stock coil heads. If you've used an RDA before you'll be right at home after a little introduction to how pre-built coils work. For vapers with no experience of rebuilding, building new coils for stock atomizer heads is a bit more difficult than rebuilding an RDA.
How many wraps Should a coil have?
How many coil wraps do I need? This depends completely on what type of coil you're building, your target resistance and even how much flavor you want from your coil. We'd usually suggest sticking to around 6 wraps as this will give you a good cross sectional surface area with decent flavor.
Can you clean vape coils and reuse them?
Replaceable coil heads that come with sub ohm tanks and clearomizers can technically be cleaned, but it won't completely revive them. Best case scenario, you get an extra few days out of a tired coil head.
Why is my coil burning after 1 day?
You're Not Priming New Coils When You Install Them Coil gunk is the most common reason why vape coils burn out, and that's a good thing because it's completely fixable through cleaning – there's no real damage to the coil.
Can vape coils be cleaned?
Soaking your Coils Clear alcohol such as vodka or ethanol is one option (vinegar if you rather). Otherwise you can always opt for warm water. Soaking your coils overnight should break up any residue on the coils and even get into the little nooks and crannies.
How do you fix a burnt coil on a disposable vape?
Prime your coils: stop the burnt hitsTake a new coil out of the box.Drip some e-liquid on the wicking holes and inside the coil head (3-4 drops will do)Assemble your tank and fill it with ejuice.Screw your tank on your mod and set aside for 10 minutes.More items...•
Is it cheaper to make your own vape coils?
Another good thing about making coils yourself is that it's generally cheaper. For example, a dripper uses strips of cotton instead of a conventional coil. Buying all the materials to pack and create a coil is also considerably cheaper if you're making them yourself.
How long do vape coils last?
between one to two weeksA new coil should last between one to two weeks. However, most e-liquids leave a thin layer of residue when they are vaporized. This builds up around your coils and wicks and can end up clogging your device in the long run.
Can you change a vape coil with juice in it?
If there is any vape juice still in your tank, dump it out in your trash can. This way, you can replace it with fresh juice after you put on a fresh coil. It is helpful to replace your coil with as little vape juice remaining as possible.
How to tear apart a vape atomizer?
To tear apart the vape tank and vape atomizer, you'll have to attempt to unscrew the vape tank. Usually, there need to be a few other steps included to fully unscrew the vape tank. First, after unscrewing as much as possible, of course - make sure there's no e-liquid left in the tank.
Why is my mod getting grimy?
This segment of your mod tends to get fairly grimy due to finger residue rubbing off on the button every time it's pressed. It's always good to disassemble this part and pay special attention to cleaning it well, as that grime will certainly build up to disgusting levels if not cleaned.
What is the battery of a vape?
Of course, the vape battery is an absolutely critical component of your device. This is what gives your device the power to be able to heat up e-liquid to turn into vapor. This is what allows your vaping sessions ...
Can you disassemble a vape mod?
Though these are not the only parts you can disassemble and reassemble in your vape mod, the sections mentioned above are areas that are generally forgotten or need to be regularly maintained. If you keep up with maintenance and cleaning, your vape and your vaping sessions will thank you. You'll be rewarded with amazing-tasting vapor and huge clouds for as long as your vape kit stays functional.
What happens when a battery heats up?
When any material heats up and cools down, it expands and contracts. Batteries are made of specific materials that minimize this expansion and contraction, but it still occurs in minute amounts. Over time, these small amounts of shift can cause cracks to form.
Why do batteries crack?
But most people don't realize that even batteries need to be regularly checked and even gently cleaned off once in a while. Since batteries are the powerhouses of the devices they are used in, they are subjected to quite a lot of heat transfer. This means that they rapidly heat up and cool down. When any material heats up and cools down, it expands and contracts. Batteries are made of specific materials that minimize this expansion and contraction, but it still occurs in minute amounts. Over time, these small amounts of shift can cause cracks to form. Cracks in batteries are not a good sign, as they can quickly become larger and start to incur on the actual lithium ion segment of the battery.
Can you clean a vape mod?
Even though vape mods are designed with customizability in mind, cleaning them can still be a chore. From the many already built-in parts to the extra technology you add, the little nooks and crannies of your box mod that you need to take care of add up quickly. Fortunately, there are some good tips and ideas that will help you properly disassemble ...
How long does it take to change out cotton?
Depending on the build though, one has to change out the cotton after as soon as a few days, or up to a couple weeks. Depends on the build, watts vaped at, and juice used.
How long does it take for a dry burning coil to glow?
s. florida. dry burning is pretty easy. hold the button for 10-15 seconds, once the coils start to glow you can do 3-5 second pulses till it glowing red hot and not emitting any more vapor, steam or what ever it is that the water wet coils are producing at that point.
Why isn't my cleaning method helping?
Why your cleaning method isn't helping is that stuff gets baked onto the coil and wick. I don't think vinegar is going to cut it. Most people use the highest volume alcohol they can get for soaking - vodka's or PGA - and soaking it in that for days. Even then, it won't remove the worst of the really baked on stuff.
Can a low end atomizer scorch?
On most low end atomizers, people generally have wicking problems when they don't allow sufficient time for a new coil head to get saturated with juice. This can scorch the wick, reducing it's wicking potential, and shorten the life of the build. A great entry level tank is the new Aspire Nautilus BDC tank.
Does dry burning remove the crud from a coil?
But dry burning does away with the concept of dissolving it and resorts to simply burning it off. Personally, it's the only effective way to get the crud off the coil and the wick inside the coil. Rickajho, Jan 16, 2014. Rickajho, Jan 16, 2014.
Can you dry burn cotton wick?
You can not dry burn a cotton wick, the wick will burn. Dry burning stock coils does help to remove the gunk that builds up on them. You can also replace the wick with silica, it will hold up to a dry burn. Dark, thick, and sweet juices can gunk up a coil quickly. Not sure what type of juice you are using.
How much does a vape coil cost?
The good news is that vape coils are relatively inexpensive, averaging between five and twenty dollars per pack. Price points can vary depending on the coil material and brand, as well as the number of coils contained in a pack. Depending on your personal budget, you should be able to find a mix of affordable options. Additionally, good vaping practices can help you go even longer between coil replacements, cutting costs even further.
What is a coil vape?
The coil is the portion of your vape device that’s responsible for heating up your e-liquid (or nicotine salts), warming it to the point of vaporization. It’s mostly thanks to the coils – and the battery that powers them – that you’re able to transform liquid vape juice into delicious, fluffy vapor.
How to break in coils?
Break in the coil by firing at a lower wattage than normal (taking short hits), then gently increasing both wattage and drag duration until you’re vaping as you typically would.
What are the common mistakes that new vapers make when buying coils?
One of the most common mistakes new vapers make when buying coils is forgetting to double-check the resistance level. Most coils are offered in at least a few resistance level choices, so you can choose accordingly to suit your preferred experience.
What does it mean when a vape has a burnt taste?
If your vapor has a burnt taste, it’s likely time to swap out your coil. You may be able to salvage it for a few more days with a thorough cleaning, but you can generally consider that coil officially retired.
Why do people switch to vaping?
If one of the reasons you made the switch to vaping was to save money, you’re definitely not alone – the lower cost of vaping compared to traditional smoking is a definite plus. When you’re used to the high cost of a pack-a-day (or more!) habit, you might just be surprised to learn exactly how much money you’ll be able to save with vaping. Even after investing in a quality vape device and other necessities, your savings are likely to be pretty significant.
What happens when you burn your vape?
A burnt or dry hit is what happens when your device runs low on e-liquid, causing the coils to heat up the wicks rather than vape juice. If you’re taking burnt or dry hits, you’ll burn through your wicking materials (and coils) at a much faster rate. Instead, utilize your device’s puff timer to aim for three to five seconds between every hit. Also, get into the habit of refilling your vape tank once it’s about three-quarters empty.
What does it mean to prime a coil?
Priming a coil means to saturate the entire cotton wick with vape juice and letting it sit for at least 10 minutes before vaping. This process is meant to break in the new coil so vapers don't get a new cotton taste or dry hits.
How to increase wattage of vape mod?
Adjust the wattage on your vape mod to the lowest recommended wattage resistance then hold on the fire button slowly and inhale. Gradually increase your wattage setting until you find your optimal range. Once coil life is done then throw the old coil away and repeat this process again!
Why does my vape get burnt?
One reason this happens is if the coil is not primed properly and it is dry . When the vape device is fired and used at a high wattage it will heat up dry cotton and gives the vaper a burnt or dry hit.
How to prime a vape coil?
How to prime a new coil for tanks: 1 Grab the fresh coil out of the box 2 Drip a couple of drops of e-liquid on the wicking holes and inside the coil head 3 Reassemble the vape tank and fill it with your choice of vape juice 4 Screw the tank on your vaping device and set it aside for at least 10 minutes 5 After the 10 minutes, inhale on the drip tip of the tank without firing 6 Adjust the wattage on your vape mod to the lowest recommended wattage resistance then hold on the fire button slowly and inhale 7 Gradually increase your wattage setting until you find your optimal range
Why is it important to take time to prep and prime your new vape coil?
It's important to take time to prep and prime your new vape coil to make sure that you are getting the most out of it and not burning it straight out of the box. Learn more about the reasons why your coils burn out to ensure you never lose a coil again!
How long to inhale e-liquid?
Screw the tank on your vaping device and set it aside for at least 10 minutes. After the 10 minutes, inhale on the drip tip of the tank without firing.
What is a pod device?
Pod devices use refillable pods that utilize a pre-installed coil. Refillable pods are extremely easy to prime, just follow these simple steps:
What to do after vaping?
After having your vape for a while, you’ll definitely want to start doing some basic vape maintenance—mainly, cleaning your device. A dirty vape has a huge effect on your vaping experience, robbing you of the thick, delicious clouds that you’re looking for. Keeping the different parts of your device clean will help you keep getting those flavorful ...
How to revive a rebuildable coil?
However, if your rebuildable coils are not that old, you can take the following steps to revive them, and get your flavor back: Keep your atomizer attached to your mod and take the atomizer apart. Make sure you leave your coils attached to your RBA (Re-Buildable Atomizer) but remove the cotton wicks.
How to clean a vape tank?
The steps for a thorough clean are: 1 First, detach your tank from your vape, empty it, and disassemble it. 2 Dampen a cloth with alcohol (you can use ethanol or even vodka) and scrub each piece to get rid of build-up/stains. 3 Rinse each piece with water and wipe it with a damp cloth, making sure to get rid of all the alcohol left behind. 4 Let the pieces of your tank air dry for 10-15 minutes. Then reassemble your tank, fill it with your delicious liquid, and carry on vaping
What is a vape coil?
The vape coil is the heating element you’ll find inside your device. Coils can be split into two types: Rebuildable Coils and Stock Coils. Stock coils are ready-made coils that can usually be fastened onto the device by your hand.
How do you know if your coils need to be cleaned?
You’ll know your coils need to be cleaned if: They are dark or crusted. You have a burnt or muted flavor. Your atomizer is leaking or spitting juice. For stock coils, or if you’ve had your rebuildable coils for an extended period (more than two months), it might simply be time to replace them.
What is a rebuildable coil?
Rebuildable coils, however, are ones that will need to be attached by using a small screwdriver, or similar tool. Rebuildable coils need to be ‘rewicked’ by the user and don’t come with cotton already installed. Now, dirty coils can be the bane of any vaper’s day. You’ll know your coils need to be cleaned if:
Why is it important to keep your vape clean?
Keeping the different parts of your device clean will help you keep getting those flavorful hits you’ve come to expect from your vape.
The sub-ohm for beginners
Some brands have understood and offer kits, while the beginner vaper wants to start with a box kit or Tube sub-ohm kit. Simple but powerful equipment, they do not require any adjustment and are very easy to use.
Why should you clean your vaporizer?
Although cheap is indeed expensive, even the most affordable vaporizers can last longer if maintained correctly. Cleaning your vaporizer is a very common thing. For example, after we eat, we brush our teeth.
The Consequence of not cleaning vaporizers
Not cleaning your vaporizer turns bad in many ways, like the reason for bad taste. If you don’t clean those residues or dirt, then the quality of the vapor could decrease.
Performance
The lack of cleaning your vaporizer can affect its process since residue accumulation will make your device work more than necessary. Sometimes these residues can block the heating chamber or damage it entirely.
Bad taste
The remaining plant material and sticky resin to your vaporizer make your vape unhealthy. It can turn to a bad taste. After a while, you do not enjoy your experience.
Dirty steam is harmed your health
The waste in the stem is the perfect reason for developing bacteria and mold, and these things could harm your health. Without knowing, you just make your health turn bad through this process.
How to clean the tank
To clean your tank, the first thing you have to do is disassemble it. Remove the resistance – but be careful. Take a good look at how the parts and packaging are placed to put it back together. Separating the parts will also give you a better knowledge of your atomizer and you will understand how it works.
The Way to Prime Mesh Coils
Hello, dear vapers. Anthony Vapes is here again. Today we’re going to talk about how to prime mesh coils.
The Answer
Well the simple answer is, it’s no different than priming any coil, but sadly I’ve seen some crazy priming methods that make very little sense. So let us go over how to prime a mesh coil but again it works with any coil type.
So what should you do?
Well, that’s pretty easy and priming a coil is much simpler than people like to think who overthink stuff. 1st thing to do is make sure you have the right juice. Most coils work best with 70/30 VG/PG juices since most mesh coils are made for DTL vaping.
The Next Step
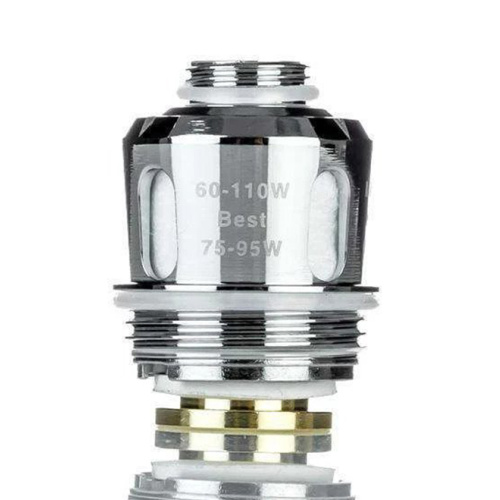
Now that the coil is juiced up nicely the next step is wattage. Most coils will have a watt range or 2 ranges printed on them. One is the full range and one being the “ best range ”. If the coil has 2 use the best range. If not then use the full range.