How To Install And Use Premade Coils On Your RDA.
- Clean your RDA of e-liquid, removing the cotton and old coils.
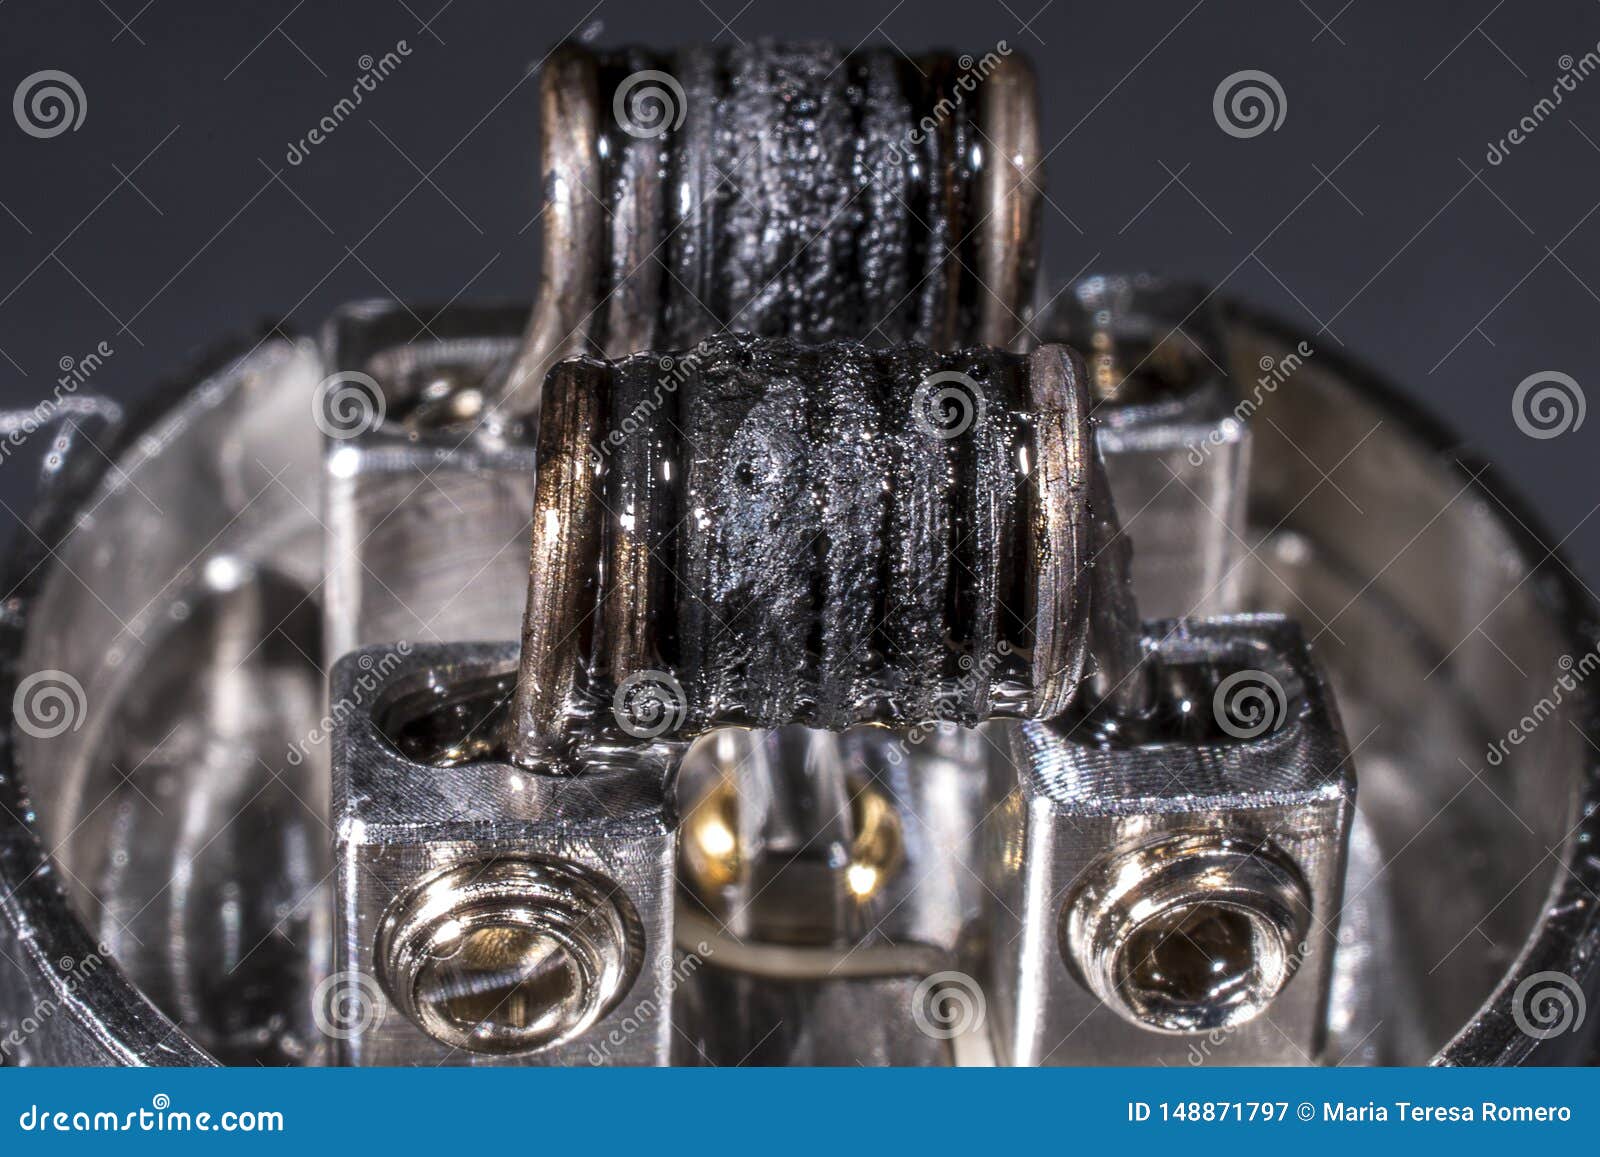
- Select and prepare your new coils.
- Insert the new coils into the posts, and gently tighten screws to secure.
- Centre the coil with a screwdriver and use wire cutters to trim excess wire.
- Use an Ohm reader to check your resistance and make sure there are no shorting problems.
- While firing the coils, use ceramic tweezers to gently squeeze them to ensure the coils heat up evenly.
- Cut a strip of wicking material a similar size to the coil, then twist into shape.

When to change your vape coil?
- Refill the tank with the chosen e-liquid and reassemble the vaping device.
- Check for any leak and rectify if any problem persists.
- The device is ready for use.
How to know when to change vape coil?
Vape Replacement Coils: How & When To Replace Them (5 Step Guide)
- Replacing Your Cartomizer. As aforementioned, most cartomizers are disposable, which makes replacing them very simple. ...
- Replacing Your Multiple Coil Atomizer. Multiple coil atomizers are great for those seeking a lavish, extra-indulgent vape experience. ...
- Replacing Your Top Coil Clearomizer. ...
- Replacing Your Bottom Coil Clearomizer. ...
How often do you change the coils in your RDA?
How often do you guys change coils in your RDA's?
- Leaked: Bloomberg-funded "Campaign for Tobacco-free Kids" Global Strategy to Ban Vaping Products by Bribing Public Bodies
- Help!! ...
- Please stop asking this sub for medical advice. ...
- Teenagers are constantly trying to buy vape products from the shop I work at. ...
- E-cigarettes more effective than nicotine replacements: study
How to change coil on Aegis vape?
Replace the atomizer coil in the Cerberus tank only when the tank is empty because the tank is likely to dump its contents when you open it. Remove the tank from the Geek Vape Aegis Solo and turn it upside down. Unscrew the tank’s bottom metal hardware, and you’ll find the atomizer coil connected to the hardware.

How do you set up an RDA coil?
How To Install And Use Premade Coils On Your RDAClean your RDA of e-liquid, removing the cotton and old coils.Select and prepare your new coils.Insert the new coils into the posts, and gently tighten screws to secure.Centre the coil with a screwdriver and use wire cutters to trim excess wire.More items...
How do you use an RDA coil?
The simple process required to use an RDA is simply to drip your e-liquid onto the coil and then to insert the RDA back into the vaporizer for use.
How do I adjust my vape coil?
3:4711:11COIL BUILDING 101 - HOW TO MAKE VAPE COILS FOR BEGINNERSYouTubeStart of suggested clipEnd of suggested clipHold it in place where you want it. Okay maybe something like that and now you take your screwdriverMoreHold it in place where you want it. Okay maybe something like that and now you take your screwdriver. And you just tighten it down that's literally.
What ohm is best for RDA?
Regular Dual Coil RDAs It is all a matter of building coils and wicking cotton with cognition of cause, it is advised to use coils that's are around 0.30 to 0.50 ohms for flavor chasing, it is also important to match the build with the e-liquid you are going to vape.
How tight should wick be in coil?
If it pulls through with space around the edges, it's too small. The wick needs to be snug without damaging the shape of your coils in the process. The best way to thread your wick is to tightly roll one end of your wick down to a point so that it can be threaded through like a needle.
Why does my RDA pop?
If you have an RDA, using the correct amount of wick is still important. If you use too much wick, you'll choke the coil. If you use too little, you'll create gaps between the coil and wick. Either way, you could end up with atomizer popping and spitting.
How many wraps Should a coil have?
How many coil wraps do I need? This depends completely on what type of coil you're building, your target resistance and even how much flavor you want from your coil. We'd usually suggest sticking to around 6 wraps as this will give you a good cross sectional surface area with decent flavor.
How many watts do I need for a .23 ohm coil?
0.23ohm | Recommended Wattage: 20-45W.
How do you calculate the resistance of a coil?
∴ Resistance of wire R=ρAL=πd/4ρ(2πnlR)=d8nlRρ
What Ohm is best for flavor?
around 0.3ohmsThe sweet spot for getting a balance of vapour and flavour is around 0.3ohms. Depending on your coil choice you'll want to up the wattage from anywhere between 50 and 100 watts.
How do you prime an RDA coil?
How to Prime a CoilRemove old coil.Replace with a new coil.Saturate the wick.Know when to stop.Siphon the e-liquid.Start low.Happy vaping.
How do I get the best RDA flavor?
Coil Placement: Most RDAs hit the side of the coil with airflow, either directly, or through a channel system. I find that positioning the coil in such a way that airflow mostly hits the bottom half of the coil increases flavour output.
How to heat up coils?
While firing the coils, use ceramic tweezers to gently squeeze them to ensure the coils heat up evenly.
How to secure coils to posts?
Insert the new coils into the posts, and gently tighten screws to secure. Centre the coil with a screwdriver and use wire cutters to trim excess wire. Use an Ohm reader to check your resistance and make sure there are no shorting problems. While firing the coils, use ceramic tweezers to gently squeeze them to ensure the coils heat up evenly.
Can you build coils for vaping?
Building coils can be an intimidating and daunting task, but that doesn’t mean they are completely out of the realm of possibility. They’re a great way to vape e-liquid, although require a slightly different method to use properly. Due to the complexity, rebuilding your coils is recommended for advanced vapers and requires a knowledge of electronics and Ohm’s Law.
Can you rebuild coils in RDA?
If you’re interested in rebuilding, we’d recommend getting yourself some pre-built coils to use in your RDA. From regular and simplified wound coils, to the more advanced claptons and hive coils, we stock a wide range to suit every advanced vaper’s needs.
Not all RDAs are created equal so pick the one that best suits your needs
If you’re on the market for a new RDA, you are probably having difficulties in setting you mind on a particular model. There are dozens of great performing rebuildable dripping atomizers out there, but they are not intended for the same category of vapers.
Make sure your coils are symmetrically placed and glow uniformly
This is one of the most important steps when setting your RDA. You need to make sure that the coils are perfectly symmetrical with respect to the center of the deck. Also it’s important to cut the leads at the same distance and make sure they glow evenly and simultaneously when dry firing the mod.
Pay close attention to the airflow slots
Not setting the airflow correctly is one of the biggest mistakes beginners make with an RDA. These slots need to be perfectly aligned with coils so that air hits the cotton perpendicularly. On some RDA models you will need to twist the barrel, the top cap or both until these slots come into position.
Why do RDAs have two coils?
The benefit of this is that it makes it even easier to connect up multiple coils, because the positive ends don’t have to share the same post-hole. This means your two coils can be completely separate from each other, and generally makes the building process easier. For this reason, the majority of RDAs released today will either have this layout or the one described in the next section.
How to thread a coil?
The best way to do this is to keep your coil on your guide throughout the process. Hold your guide as you feed the legs through the open post holes. This is where having different length legs is useful: then you can thread them through one at a time rather than both at once. Use your guide to position the coil as close to the posts as you can. Once you're happy with the position, tighten down the screws. Make sure the legs are pointing off into the air and not touching the deck, each other or the posts of your RDA – otherwise you could get a short.
What is the RDA in a deck?
The general structure of an RDA consists of a top cap and drip tip covering a deck. The top cap is simply the outer cover of the RDA, and the drip tip is really a mouthpiece for inhaling through.
What is a rebuildable dripping atomizer?
A rebuildable dripping atomizer (RDA) is a bare-bones style of e-cig atomizer. They feature a coil and wick but no tank to hold e-juice. Instead, you drip smaller amounts of e-liquid directly onto the coil and wick. Then you vape until the wick starts to dry out before dripping again.
What is an RTA atomizer?
RTA stands for “rebuildable tank atomizer.” These are basically the same as RDAs except they do have a tank. This means you get the performance without the constant dripping. This provides a nice balance between the improved performance of a rebuildable atomizer and the convenience of the more common tank systems. In practice, the structure of an RTA is basically a mini RDA surrounded by a tank, with small holes for juice to feed up into the wicks.
What is a wide bore drip tip?
Drip tips used to all be fairly narrow, but now many devices come with “wide-bore” drip tips. These have larger openings to improve airflow. If you’re looking for a direct-to-lung vape and want big clouds, wide-bore drip tips are a great feature for an RDA. However, they do reduce flavor compared to thinner tips.
What is the most common alternative layout for RDAs?
There are quite a few other unique designs for RDAs (discussed on this reddit thread ). However, the most common alternative layout you’ll find is a postless deck.
Where is the positive post on a RDA?
The positive post on an RDA is the piece that is connected through to the pin on the bottom of the atomizer. This comes into contact with the positive pin of the 510 connection on the device and is separated from the negative by an insulator. For the most part the positive post is in the center of the deck, however there are some RDA’s (like the one pictured above) that only have two posts. The way to be sure what post is positive is paying attention to where the insulator is. The positive post will always be the one with the insulator around it and not directly milled out of the deck.
What is a 510 connection?
The 510 connection is the piece protruding out the bottom of the RDA which is screwed into the device. The outer threading of the 510 is negative and the center is positive. Inside of the 510 connection there is an insulator separating the two.
What is a cyclops RDA?
Depending on the design of the RDA the airflow can vary greatly. Traditional RDA’s have one or two horizontal airflow slots commonly referred to as Cyclops style. With this kind of airflow the air comes in from the side and strikes the coil horizontally.
Where does air come from in a RDA?
With some RDA’s the air comes from the base and rises up directly underneath the coil are these are referred to as bottom airflow.
How many posts does a RDA have?
The traditional RDA type has three posts, a positive centre post and two negatives. Such as the CLT V3 mini pictured below. While it is straightforward to work with when making a single coil it can be more awkward when working with dual coils because one leg of each coil has to fit thought the centre post hole.
Why use pliers in RDA?
Also they help to grab the end of cotton when pulling it through the centre of tiny coils. Using pliers helps you grab the coil when you need to get it into a better position inside the RDA chamber. They are also invaluable when pinching your coil wraps (more on that later) together.
Why is it awkward to work with dual coils?
While it is straightforward to work with when making a single coil it can be more awkward when working with dual coils because one leg of each coil has to fit thought the centre post hole.
How to roll a wick?
Rolling a wick is very straightforward and as long as it passes through your coil with a little friction you shouldn’t run into many problems. Always trim the wick level with the deck and push the cotton down lightly into the well.
Is it easier to build a dripper with a single coil?
This means that some RDA’s can be easier to build than others. It is important when you first start to pick a dripper that can be built with a single coil because building duals does require additional knowledge and a little experience.
The Wash and Brush Method
You can clean your coil using the wash and brush method while it’s mounted to the RDA, but it’s easiest to remove the coil, clean it and then re-mount it. While holding the coil under running water, scrub the gunk away with a small wire brush.
The Ultrasonic Cleaner Method
Buying an ultrasonic cleaner might be a bit of an investment, but it’ll serve you well if you want to keep your RDA coils working as long as possible. It’ll work even better if you buy a second RDA, so you can use one while cleaning the other.
Making Your Coils Last Longer Between Cleanings
The only thing better than a simple RDA cleaning method is a strategy to prevent your coils from becoming gunky in the first place. The best way to make your coils last longer between cleanings is by using unsweetened e-liquid. Sucralose – the most common e-liquid sweetener – doesn’t vaporize like e-liquid’s other ingredients.
How many puffs between drips for RDA?
With this technique, you’re RDA will go from 5-6 puffs between drips to 20+.
How long do coils last?
Most coils should last a good long while (a month or so), providing you maintain them correctly. How you do this is simple: remove all the cotton and fire the mod so that the coils heat up. This will burn off all the gunk and, trust me, you really don’t want to be re-wicking on a dirty coil.
What does it mean when your coils pop?
If your coils pop when you’re vaping, don’t worry, all it means is you haven’t used enough cotton.
How do you know if a coil is thick?
You’ll know it’ s the right thickness when there’s a bit of resistance on the coil, but not enough to stop it moving through.
How to get optimum performance from your tank?
To get optimum performance from your tank, you need to clean it regularly. Simple, I know, but so many people DO NOT do this and then complain when things stop working properly.
Is it safe to build coils?
If that’s your bag, you will definitely want to invest in a coil building kit, as it is the easiest and safest way to create your own coils.
Is it worth learning the Scottish Roll Wicking Technique?
If you’re a beginner just finding your feet, it is definitely worth learning The Scottish Roll Wicking Technique.