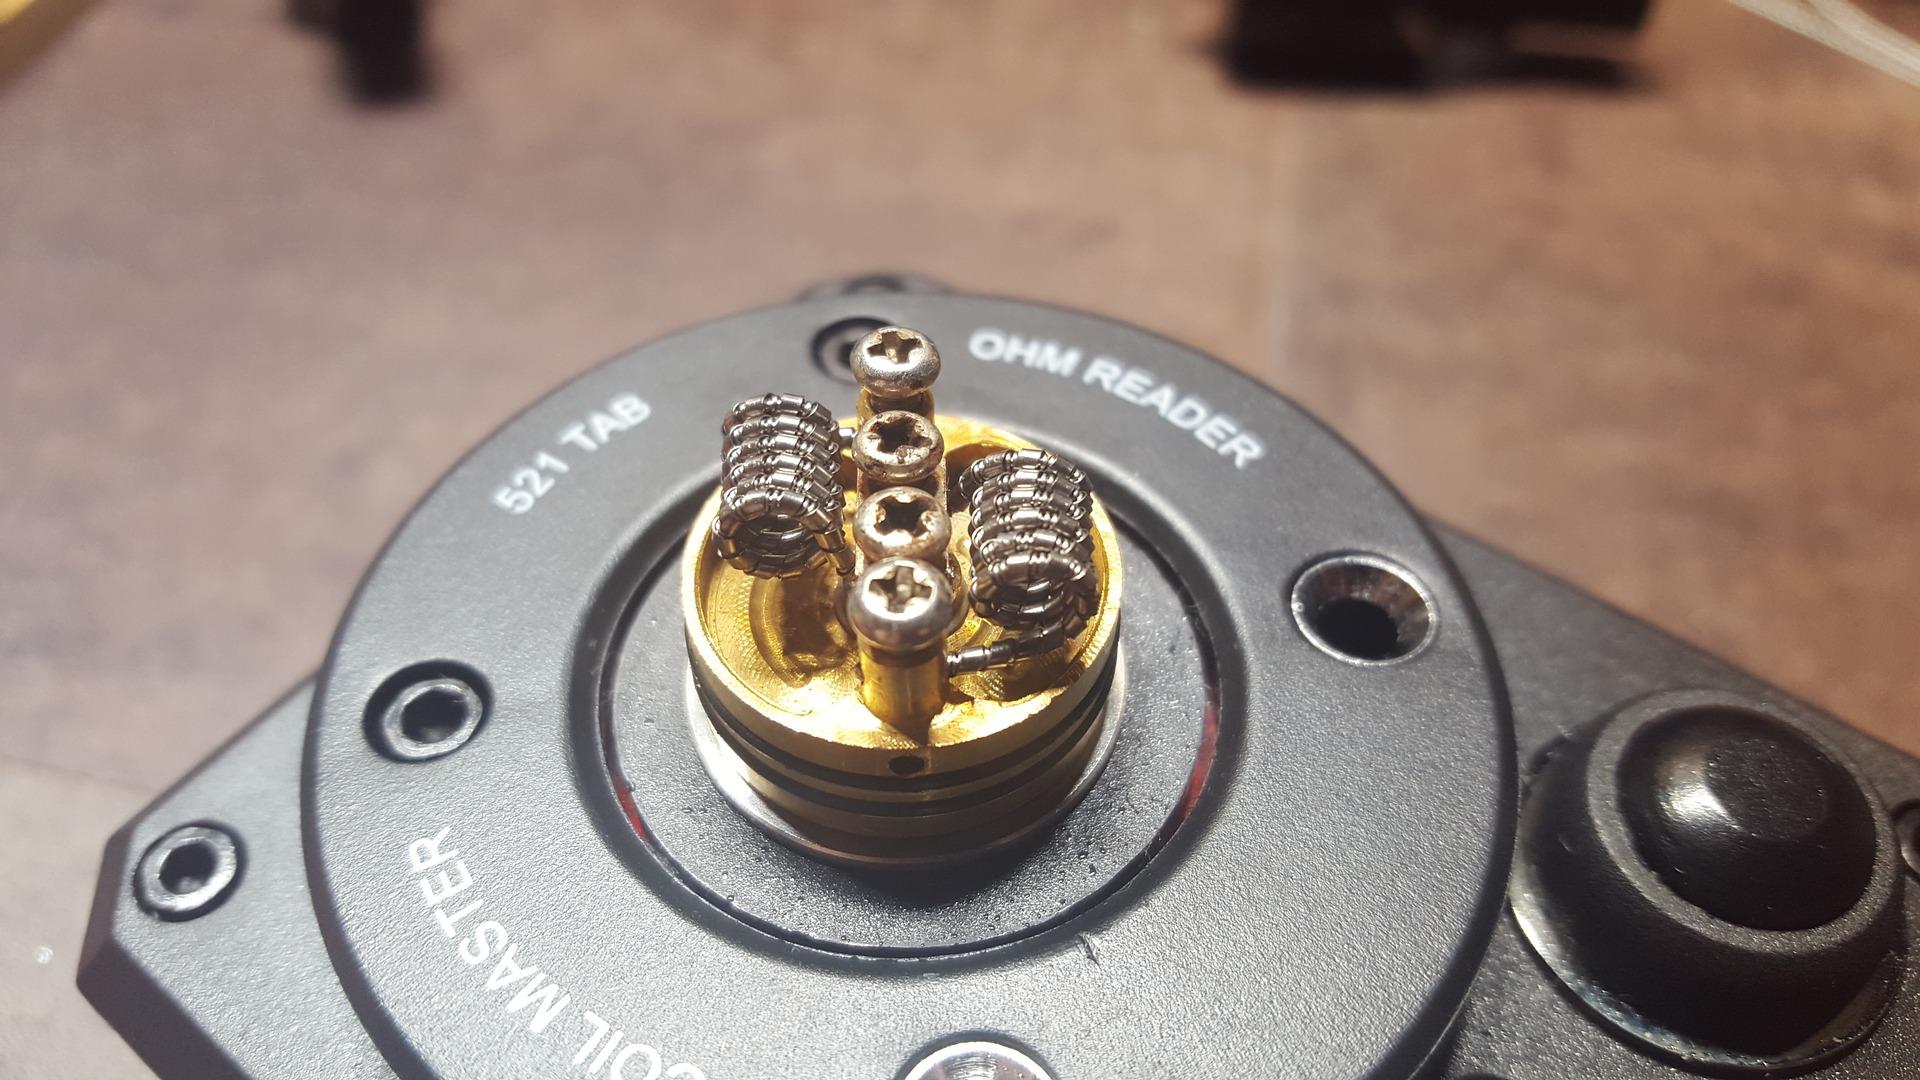
Use the needle-nose pliers to adjust the coil positions. Attach the ohm meter to the atomizer and check the resistance of the build, it should be as close as possible to the recommended rating on your battery; adjust the coils and tighten or loosen the screws on the leads until you get the right reading, do not proceed until you do so.
Full Answer
How to replace a coil in a vape?
Vape Replacement Coils: How & When To Replace Them (5 Step Guide)
- Replacing Your Cartomizer. As aforementioned, most cartomizers are disposable, which makes replacing them very simple. ...
- Replacing Your Multiple Coil Atomizer. Multiple coil atomizers are great for those seeking a lavish, extra-indulgent vape experience. ...
- Replacing Your Top Coil Clearomizer. ...
- Replacing Your Bottom Coil Clearomizer. ...
What is the best coil for vaping?
Top 6 Best Premade Coils for Flavor – Our Reviews:
- Alien Coil. The Alien is a popular coil as a result of its features that provide easy vaping and a pleasant flavor.
- Tiger Coil. The Tiger coil is a premade coil that is created from using a 30 gauge Kanthal and a 0.8mm ribbon wire.
- Framed Staple Coil. ...
- Hive Coil. ...
- The Flat Bastard Coil. ...
- Tidal Wire Coil. ...
How to build your own vape coils?
What Is The Best Wire For Building Coils?
- Clapton: a round wire which is wrapped with a higher gauge wire
- Fused Clapton: a Clapton but with more than one core
- Staggered Fused Clapton: this is two spaced Claptons held together with another wrap
- Staple Coil: up to 10 ribbon wires stacked together before being wrapped with a higher gauge
- Tiger Wire: a round wire which is twisted with ribbon wire
How often should you replace vape coils?
How do you know when your vape coil needs changing?
- Burnt Taste. The first and most prominent way to tell your coil needs changing is by experiencing an unpleasant burning taste in your vape.
- Bubbling Noise. In this case, your device is literally telling you to change the coil.
- Weak Flavour.
- Little Vapour.
- Leaking Device.
Can I rebuild vape coil?
It's actually disarmingly simple to rebuild stock coil heads. If you've used an RDA before you'll be right at home after a little introduction to how pre-built coils work. For vapers with no experience of rebuilding, building new coils for stock atomizer heads is a bit more difficult than rebuilding an RDA.
How can I make coil at home?
9:3011:11COIL BUILDING 101 - HOW TO MAKE VAPE COILS FOR BEGINNERSYouTubeStart of suggested clipEnd of suggested clipAnd just keep wrapping. Until you get the coil that you want. Right. Once you get the coil that youMoreAnd just keep wrapping. Until you get the coil that you want. Right. Once you get the coil that you want. Give it a little twist. Give it a little compression. Now like I showed you the last time.
How do you fix a vape coil at home?
How to Clean a Burnt CoilSTEP ONE: SOAK YOUR COILS. First thing's first, remove your coils from your e-cig and let them soak in a bowl of hot water to loosen any residue.STEP TWO: CLEANSE YOUR COILS (optional) ... STEP THREE: LEAVE TO AIR DRY. ... STEP FOUR: PRIME THE COILS. ... STEP FIVE: REPLACE.
Can you clean and reuse vape coils?
Replaceable coil heads that come with sub ohm tanks and clearomizers can technically be cleaned, but it won't completely revive them. Best case scenario, you get an extra few days out of a tired coil head.
What materials can vape coils be made of?
There are five different types of vape wires generally used: Kanthal (FeCrAl), NiChrome, Stainless Steel, Nickel, and Titanium.
What is vape coil made of?
The most commonly used coils are made of alloys of iron, chromium, and aluminum or nickel and chromium.
Can you clean a burnt coil?
So, carefully remove the coil from the hot water and submerge it in the cold water. With this, any remaining debris will fall off, and your coil will be clean again. If you have done this and still experience the annoying burnt taste vape, then you can clean it using vinegar or lemon juice in hot water.
Can a burnt vape hurt you?
Depending on how bad the coil is burnt, you could end up choking or vomiting immediately. Depending on what kind of coil you are using they can produce some particles that stick to the vapor and end up ingested by the user when they are burned dry. Some have an allergy to these particles being created.
Why is my coil burning after 1 day?
Ensure Your Tank Is Properly Filled While this might seem obvious, the first port of call when your coil is burning is to ensure that it is properly saturated with e-liquid. Allowing your tank to run on empty while still vaping will inevitably cause dry burn, which can permanently damage the coil.
Can I boil vape coils?
About 5 minutes to 10 minutes are recommended for boiling time. Too long time may cause damage to meta coil. Then put all atomizers into cold water about two minutes. Then boil them again.
Can you reuse coils with water?
0:315:44How to clean you coils, wash and reuse sub ohm coils Save your moneyYouTubeStart of suggested clipEnd of suggested clipSo as you can see this coils looking pretty Brown. Probably time to be replaced. So we're just gonnaMoreSo as you can see this coils looking pretty Brown. Probably time to be replaced. So we're just gonna pull the coil out get a little bit of hot water going and rinse it out.
Can I use medical cotton for vape?
It is medical-grade cotton that is completely purified. As a bonus, Cotton Bacon comes pre-arranged in long strands that fit perfectly into most vape coils.
How to build a coil for a RDA?
First, examine the deck and see if it is a dual or a single-coil atomizer. Then check the size of the deck and see how large your build can be—you don’t want your coils to touch the top cap as this will cause a sort.
What do you use to pinch coils?
Wire: any of the vaping wires would do. Flush cutters: wire cutters that can cut close in small spaces. Ceramic tweezers: to pinch your coils while pulsing. Fine tip tweezers: to fluff your cotton and place it inside the wick ports. Small metal rod: a small screwdriver, or coiling tool.
How are micro and macro coils created?
Micro and macro coils are created by taking a single piece of wire and wrapping it around a screwdriver, drill bit, or coil jig. The difference between a micro and a macro coil is the inner diameter of the coil. It’s that simple.
What is macro coil?
Macro: a macro coil build is a coil that has an inner diameter that’s 2.5 mm and above. The bigger the inner diameter of the vape coil, the higher its resistance, and vice versa. Likewise, the thicker the gauge of wire used, the lower the resistance will be.
Why do you need to have two coils?
When doing a dual coil build, it’s essential for both coils to be identical in size and form, to ensure that they heat up properly. Dual-coil builds obviously create more vapor than a single coil of the same specs, but require double the power to perform.
How to save money on vaping?
One of the best ways to save money in vaping is to build your own coils. Rather than buying disposable coil heads every week, you can make your own. It’s a fun hobby that vapers not only take pride in, but get to enjoy the fruits of their labor. The way to get good at it is through practice. Although, it’s perfectly reasonable for first-time ...
What is a parallel coil?
In essence, a parallel coil is made out of two or more wires wrapped next to each other. Resistance is divided by the number of wire strands, so make sure you are aware of your device’s limits when building parallel coils. For beginners, a dual parallel 26-gauge Kanthal coil would be a nice starting point.
Why rebuild coils?
There are four key reasons you might want to start rebuilding stock coils, although the main benefits are encapsulated by the first two. Saving Money: Pre-built coils are expensive. In comparison, a huge spool of kanthal, stainless steel, nickel or titanium is cheap and cotton is even cheaper. For the price of one five-pack ...
How to wick a coil?
Wicking your coil is the next step. To do this, take a sheet of Japanese organic cotton and place it next to your co il. Cut a strip from it that’s wide enough to cover the length of your coil. As for length, just keep the whole length of the sheet for now. Remove the front and back layers of the cotton so you have two fluffier faces for wicking.
How does a stock coil work?
Stock coil heads ultimately work in a very similar way to RDAs. The two “legs” on the coil are connected up to a positive and a negative contact point on the atomizer head. These are threaded with or surrounded by wick so it can soak up juice and keep you vaping.
Why do you need a plier on a coil?
Pliers, tweezers or ideally both: Pliers or tweezers are needed to take the atomizer head apart and to properly align the leads with the contact points on the coil housing . Pliers are also particularly useful because building for stock coil heads requires you put a sharp kink in one of the legs of your coil.
How much does it cost to replace a coil?
The only downside is that picking up replacement coils can get expensive very quickly, often costing $2.50 per coil or more. While this isn’t very much per coil, over a year or more of vaping the costs can really mount up. However, there is a solution: rebuilding stock coil heads yourself.
What is the main tube of an atomizer?
The main tube is hollow, and has a large chamber for the coil itself to sit in. The two legs of the coil point directly down towards the bottom of the atomizer head, and are trapped by a rubber grommet and a metallic pin.
Is vaping cheaper than coils?
However, if you like the convenience of your favorite sub ohm tank but the cost of coils is just getting too much for you, learning to rebuild your own coils can save you tons of money. Vaping is cheap anyway, but you can make it even cheaper.
How to get a vape coil to glow?
Before it has a chance to cool down, grab your needle nose pliers and gently squeeze the two ends of your vape coil together. Rinse and repeat until your coil is glowing evenly starting from the centre and moving towards the outer wraps.
Where is the coil located on a vape?
The coil is either situated at the top or the bottom of the atomiser. While variations in coil design may change the vapor and flavor output, vape coils essentially all work the same way.
How to use coil jig?
Use your Coil Jig (which should still be through the centre of your coil) to push and pull the coil until it’s positioned exactly how you want it. When you’re satisfied with the position and the coil is as even as possible, remove the Coil Jig and give yourself a pat on the back.
What is vertical coil?
The vertical coil can be wicked on either the inside or outside, which is more commonly known as a ‘chimney’ coil. These coils have gained popularity, due to the improved airflow and flavor as more of the coil surface area is in contact with the wick.
What happens when you heat up a mod?
When you fire your mod and heat the coil, the e-juice is vaporised and this vapor is what you inhale.
Is nickel a good heating wire?
Nickel has a very low resistance to electrical current, which means it’s one of the fastest heating wire types. However, it’s normally used only in temperature control mode so may not be the best choice for your first attempt at vape coil building.
How to take off a vape coil?
The coil is also called an “atomizer head” or “replacement head.”. You can use your hands or a paper towel to take off the coil. Twist the coil counterclockwise until it comes off of the bottom of your vape. A paper towel will help keep your hands clean.
How to get rid of burns in vape coil?
1. Pre-saturate your coil with 5-8 drops of vape juice. The cotton in your coil is brand new when you take it out of the package. If you place it directly onto your vape, it will start to burn. To avoid this, drip about 5 or so drops across the cotton from the vape juice bottle.
How to get vape juice out of tank?
If there’s any vape juice still in your tank, dump it out. Next, unscrew the co il from the base of the vape by twisting it counterclockwise. Pre-saturate your new coil with 5 to 8 drops of vape juice so it won’t burn, then screw your new coil into place.
How to unscrew a vape tank?
Every vape setup is slightly different, but in general, you can easily unscrew the tank from the bottom section. Hold the tank upside down and twist the tank off using your hands. If there is juice in your tank already, you can use a paper towel to avoid getting your hands greasy.
Why does my coil clog up?
If it has a burnt aftertaste or if the flavor seems sour, it is time to change your coil. Over time the juice starts to clog up the coil. If you use sweet, sugary juices, they may clog up your coil more easily. The sweetener essentially caramelizes on the coil as it heats up.
Can you use more or less juice in a vape?
Use more or less juice, depending on the size of your coil. Make sure the coil you purchase is the right coil for your vape. Read your instructions to determine the type of coil or bring your tank to a local vape store.
Can you replace a vape coil with fresh juice?
If there is any vape juice still in your tank, dump it out in your trash can. This way, you can replace it with fresh juice after you put on a fresh coil. It is helpful to replace your coil with as little vape juice remaining as possible.
How to make a coil?
1. What You Will Need To Build Coils: 1 An ohms reader 2 RDA of your choice 3 Resistance Wire: Kanthal or NiChrome (We are using 28ga Kanthal in this tutorial) 4 Small blue 2mm screwdriver (included with most RDA’s) or 2mm drill bit/ 14ga blunt tip needle 5 Additional small screwdriver or Allen key that fits your RDA’s screws. 6 Small butane or propane torch. 7 Tweezers (preferably ceramic tipped), needle nose pliers, or forceps. 8 Small wire cutters or nail clippers 9 Scissors 10 Wicking Materials: organic cotton, silica, eko-wool etc. 11 E-juice 12 A little time and patience.
How to use Kuro coiler?
We will use the 2mm Kuro Coiler here. First insert wire into the hole 1 on the side of the handle leaving approximately 1/2” of wire sticking out from the hole in the handle. Hold the end of the wire against the handle so it cannot slide back out. Pull the loose end of your wire around the shaft. Place the top winding piece on to the shaft with the pin towards the handle. Turn the top winding piece slowly so it catches the wire and starts wrapping. Be gentle. Excessive pressure will cause the wire to wrap over itself. Once you have 8 wraps remove the top winding piece and straighten the wire that sticks through the hole in the handle. Adjust or straighten the leads as needed then remove the coil from Kuro Coiler’s shaft and slide it on to your small blue screwdriver for installation.
How to make a kanthal wire?
You will then want to hold the end of your wire with your tweezers, pliers, forceps, etc. Light your torch and carefully heat the kanthal wire at one end until it glows orange then slowly move the torch down the entire piece of wire. Give your wire a moment to cool then grab the other end of the wire and repeat. Oxidizing the wire will make it less “springy” and easier to work with.
What does it mean when coil resistance is.2 ohms?
If your coil is displays the proper resistance within .2ohms you are ready to move on to the next step. However if your ohms reader is not reading your coil or displays a resistance more than .2 ohms different than your target resistance there is a problem that needs to be fixed. Usually issues are easily fixed.
Can you put RDA on a mod?
Now that we have made sure your coil is installed properly and there are no shorts, you are ready to put your RDA on to your mod. Once your RDA is installed onto your mod you will want to briefly fire your mod until the coil begins to glow.