How to prime a new coil for tanks:
- Grab the fresh coil out of the box
- Drip a couple of drops of e-liquid on the wicking holes and inside the coil head
- Reassemble the vape tank and fill it with your choice of vape juice
- Screw the tank on your vaping device and set it aside for at least 10 minutes
- After the 10 minutes, inhale on the drip tip of the tank without firing
- Adjust the wattage on your vape mod to the lowest recommended wattage resistance then hold on the fire button slowly and inhale
- Gradually increase your wattage setting until you find your optimal range
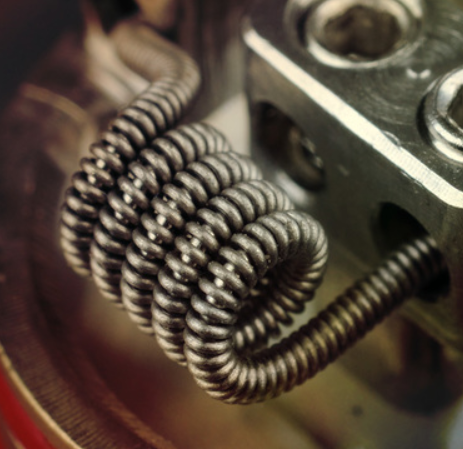
How to build your own vape coils?
What Is The Best Wire For Building Coils?
- Clapton: a round wire which is wrapped with a higher gauge wire
- Fused Clapton: a Clapton but with more than one core
- Staggered Fused Clapton: this is two spaced Claptons held together with another wrap
- Staple Coil: up to 10 ribbon wires stacked together before being wrapped with a higher gauge
- Tiger Wire: a round wire which is twisted with ribbon wire
What is the best coil for vaping?
Top 6 Best Premade Coils for Flavor – Our Reviews:
- Alien Coil. The Alien is a popular coil as a result of its features that provide easy vaping and a pleasant flavor.
- Tiger Coil. The Tiger coil is a premade coil that is created from using a 30 gauge Kanthal and a 0.8mm ribbon wire.
- Framed Staple Coil. ...
- Hive Coil. ...
- The Flat Bastard Coil. ...
- Tidal Wire Coil. ...
How can I make a heater coil at home?
You will need:
- IRFP260 Mosfets
- Fast Diodes
- 12 volt Zener Diodes
- 220 Ohm resistors
- 10K Resistors
- 10x /.047uF capacitors
- 2x 50uH inductors (Get from a computer power supply) Amazon Link
- Copper wire Amazon Link
- Wood
- 2x Sealed Lead Acid Batteries Amazon Link
How to make a great homemade vaporizer?
Things You'll Need
- Shallow food container with plastic lid
- Glass bottle with screw cap
- Pen
- Hobby knife
- Drill with 1/4-inch and 1/2-inch bit
- Red plastic plate
- Scissors
- Hole punch
- Waterproof glue (non-toxic)
- 12-gauge florist wire

How do I prepare my new vape coil?
0:451:52Priming a vape coil in 2 minutes - YouTubeYouTubeStart of suggested clipEnd of suggested clipGet your either quid. And add a drop onto each of the liquid inlet holes add a few drops onto theMoreGet your either quid. And add a drop onto each of the liquid inlet holes add a few drops onto the wicking material down the middle hole put your vape coil in your tank fill your tank with the liquid.
What happens if you don't prime your vape coil?
Unfortunately, if you didn't prime your atomizer / coil properly and your wicking material is burnt, there is no way to bring it back. That taste will stay until you change your atomizer head containing a new coil.
Is priming a coil necessary?
Priming your coil basically means ensuring it is thoroughly soaked with e-liquid before you start to vape. The process of priming is intended to prevent “dry hits” when you first install a new coil, and for this reason it's only really necessary when you're using a brand new coil.
Should I put juice on my coil?
How Can We Stop Our Coils From Burning Out? Well, from the above, it's clear that the key thing we need to ensure is that there's always juice in the wick when we vape. This means you shouldn't “dry burn” your coils, because most wicks are made from cotton and will simply get ruined without juice there to protect them.
How long should you prime a new coil?
How Long Should You Prime a Vape Coil For? It's always recommended to leave your coil to prime for as long as possible - anywhere between 5-30 minutes. The longer you leave it the better, but most coils should be ready to vape after around 5-10 minutes.
How long do you soak a vape coil?
Simply add a few drops of e-liquid onto the wicking material of your atomizer head before you install it into your tank. Then after filling your tank leave it to soak for 5 – 10 minutes. Just before you vape your new atomizer head for the first time take a few sharp draws on your tank before you press the button.
Why does my coil taste burnt after 2 days?
It tastes burnt because the wick inside your atomizer coil has dried out and burned up when it was heated. The wick is the part of your vaporizer that soaks up the eliquid from the tank. The wick holds onto this eliquid before it is turned into vapor when the coil heats up.
Does chain vaping burnt coil?
“Chain vaping” – just vaping and vaping continuously until you can't see your e-cig for all the clouds – can lead to a burnt wick too. The reason for this is the balance mentioned earlier: you need to ensure that your wick can re-saturate with juice before you hit the fire button again.
What wattage should I vape at?
On the contrary, even 10 watts is sufficient to guarantee a satisfying vape, which may be ideal for new vapers. As you become more experienced, it's safe to say that vaping starts to shine between the range of 40 and 50 watts.
How long should I wait between vape hits?
15 to 30 secondsDon't Chain Vape You must let your wicks saturate to reduce the possibility of a dry hit. The general rule is to wait 15 to 30 seconds before puffing again. For people who are trying to quit smoking, 30 seconds can be a long wait. In this case, you can buy e-juice with a higher nicotine level.
Why is my vape burning my throat with new coil?
Some vapers are quick to blame it on a faulty coil, but new coils usually get burnt because they haven't been primed before use. By priming your coil, we basically mean preparing it and getting the wick nice and saturated with e-juice.
Can I rinse my vape coil with water?
Letting dirty coils soak and having water pass through them will remove some of the residue, but not all of it. And on top of that, you will need to wait for water to fully evaporate, which may take a while. If you still want to clean your coil heads, then you can follow the old soak and rinse method.
Tools Needed
A few basic tools and supplies is all you need to build or make a coil, we have compiled a list for you. There can be a lot of variation in tools used, this is what works for us, but if you get started you may find other items that help the process and that is fine. List of tools:
Build Mat for a Clean Work Space
Are you ready to get to work? Again, the best way to describe the actual process is with a visual aid, and the best way to do that is with a video! Please check out this coil building video here: https://youtu.be/BBpwZoxG3d0
What IS a coil exactly? How does it work?
The function of a coil is relatively simple: heating up the e-liquid held within the cotton* wick to the correct vaporizing temperature. There are typically small holes, or ”wells” in the side of the coil housing. Behind those lays the cotton itself, which holds the liquid against the literal coiled wire in the center.
Priming My Coil: Step by Step Guide to Perfection
Isolate or expose the coil. Take apart your tank (lefty loosey, righty tighty) until your coil is fully exposed.
How to build a coil for a RDA?
First, examine the deck and see if it is a dual or a single-coil atomizer. Then check the size of the deck and see how large your build can be—you don’t want your coils to touch the top cap as this will cause a sort.
What do you use to pinch coils?
Wire: any of the vaping wires would do. Flush cutters: wire cutters that can cut close in small spaces. Ceramic tweezers: to pinch your coils while pulsing. Fine tip tweezers: to fluff your cotton and place it inside the wick ports. Small metal rod: a small screwdriver, or coiling tool.
How are micro and macro coils created?
Micro and macro coils are created by taking a single piece of wire and wrapping it around a screwdriver, drill bit, or coil jig. The difference between a micro and a macro coil is the inner diameter of the coil. It’s that simple.
What is macro coil?
Macro: a macro coil build is a coil that has an inner diameter that’s 2.5 mm and above. The bigger the inner diameter of the vape coil, the higher its resistance, and vice versa. Likewise, the thicker the gauge of wire used, the lower the resistance will be.
Why do you need to have two coils?
When doing a dual coil build, it’s essential for both coils to be identical in size and form, to ensure that they heat up properly. Dual-coil builds obviously create more vapor than a single coil of the same specs, but require double the power to perform.
How to save money on vaping?
One of the best ways to save money in vaping is to build your own coils. Rather than buying disposable coil heads every week, you can make your own. It’s a fun hobby that vapers not only take pride in, but get to enjoy the fruits of their labor. The way to get good at it is through practice. Although, it’s perfectly reasonable for first-time ...
What is a parallel coil?
In essence, a parallel coil is made out of two or more wires wrapped next to each other. Resistance is divided by the number of wire strands, so make sure you are aware of your device’s limits when building parallel coils. For beginners, a dual parallel 26-gauge Kanthal coil would be a nice starting point.
What do you need to make coils?
To start building your own coils from scratch, you’ll need to following items. Fingernail clippers/thin wire cutter. Precision screwdriver set. Kuro Koiler Tool (which I suggest) A pair of scissors for cutting your cotton. An Ohms Reader is recommended but not required if you are using a regulated mod. Kanthal Wire.
What is coil building?
Coil Building is the art in which you build your own coil put it in your RDA, RTA or RBA, wick it and thus create your own, bespoke coil.
Is a twisted coil faster than a clapton coil?
This coil takes a lot of patience and a bit more time than even the Twisted Coil but once you have done a few Clap ton Coils then you will be faster. In addition to being faster, you will get great flavor and cloud production from the Clapton. You install a Clapton the same as the other coils.
Can cloud chasers build their own coils?
And the reasons why are myriad; some prefer the flavor, others enjoy the craft. Any cloud-chaser worth their salt will almost certainly build their own coils — this is the only true path to truly GIGANTIC cloud plumes. It’s also A LOT cheaper than buying pre-made coils from vape brands like SMOK for use inside a sub-ohm tank.
Why do vapers not know coil building?
The reason being is that several vapers are actually unaware of what coil building is and how it’s done. Some vapers may hear of coil building but think it’s something that’s impossible for them to do themselves. Having the right knowledge is obviously important but using the right materials and tools is even more crucial.
What is a coil jig?
Coil Jig is a vape tool that helps wrap the coil consistently. Further, it guides the wire to wrap on the rod properly. It is a useful tool to build coils with minimum effort.
How many slots are there in a dual coil atomizer?
In the dual coil atomizers, one must check for the positive and negative slots. There are two positive and negative slots for the dual coil building. In dual atomizers, the airflow remains on the side to reach both the coils equally.
What is coil resistance?
Coil resistance decides the power of the vape device and the amount of power it will draw from the battery. A low resistance draws high power from the battery hampering the safety of it. It can cause a battery explosion. Testing the resistance and identifying the problems prior to using the coil is a must.
What is macro coil?
Macro coil builds: Macro coil builds are the coils with an inner diameter of more than 2.5mm. The bigger inner diameter has a higher resistance and vice versa. However, one can go for a Clapton coil build. Twist two different wire strands against each other to form this coil.
Can you build your own coil?
Own coil building is easy than it looks. In this current post, you have seen the way you can build your own coil. Building a coil can be challenging, especially if you try building complex coils. You need different drills and tools to build such coils.
Is coil building good for vaping?
Coil building is very possible for anyone seeking to take their vaping experience to the next level and It can be incredibly rewarding to take the first drag of your very own build. A perfect coil build needs practice and dedication.
How to get a vape coil to glow?
Before it has a chance to cool down, grab your needle nose pliers and gently squeeze the two ends of your vape coil together. Rinse and repeat until your coil is glowing evenly starting from the centre and moving towards the outer wraps.
Where is the coil located on a vape?
The coil is either situated at the top or the bottom of the atomiser. While variations in coil design may change the vapor and flavor output, vape coils essentially all work the same way.
How to use coil jig?
Use your Coil Jig (which should still be through the centre of your coil) to push and pull the coil until it’s positioned exactly how you want it. When you’re satisfied with the position and the coil is as even as possible, remove the Coil Jig and give yourself a pat on the back.
What is vertical coil?
The vertical coil can be wicked on either the inside or outside, which is more commonly known as a ‘chimney’ coil. These coils have gained popularity, due to the improved airflow and flavor as more of the coil surface area is in contact with the wick.
What happens when you heat up a mod?
When you fire your mod and heat the coil, the e-juice is vaporised and this vapor is what you inhale.
Is nickel a good heating wire?
Nickel has a very low resistance to electrical current, which means it’s one of the fastest heating wire types. However, it’s normally used only in temperature control mode so may not be the best choice for your first attempt at vape coil building.