What is the best way to make Wicks?
May 08, 2021 · Step 2) Plug your recipe into a calculator. Enter your recipe and quantities into your choice of calculator. Most recipes won’t give defined volumes but instead will give a percentage. This is great as it allows you to make variable quantities of each vape liquid.
What is DIY vape juice?
Jul 12, 2017 · First, get your cotton ball and stretch it into a rope-like shape. Your cotton wick should be several inches long at this point. Roll it between your fingers to compact the fibers a little bit. Remember, you will need to thread your wick through your coils, so …
What is the best wicking material for vaping?
Ceramic tweezers: to pinch your coils while pulsing. Fine tip tweezers: to fluff your cotton and place it inside the wick ports. Small metal rod: a small screwdriver, or coiling tool. Organic cotton: or whichever wicking material you prefer. Scissors: to trim your cotton.
How to wrap vape coils?
Mar 01, 2019 · How To Build Your Own Vape Coils: The Tools You’ll Need Fingernail clippers/thin wire cutter Precision screwdriver set Kuro Koiler Tool (which I suggest) A pair of scissors for cutting your cotton An Ohms Reader is recommended but not required if you are using a regulated mod Kanthal Wire Organic ...

What can I use as a vape wick?

- Cotton. Cotton is the wick material found in most vaping e-cigarette devices these days, either as a thin sheet wrapped around a replaceable coil head or as a fluffier material suitable for rebuildable devices. ...
- Silica Cord. ...
- Ceramic. ...
- Stainless Steel Mesh. ...
- Rayon. ...
- The Future.
What are vape wicks made of?
How do I wick my vape?
How do you wick a coil with cotton bacon?
What can I use instead of vape cotton?
Make sure to get the 100% Rayon Cellucotton, they also offer cotton Cellucotton but in your e-cigarette you want the wick from the Rayon kind. It has all the best properties of cotton wick without the “cotton flavor”. It wicks fast, holds a ton of e-liquid, and has almost no flavor.Oct 29, 2018
Can I use normal cotton balls for my vape?
How do you wick?
How do you wick with cotton pads?
What is silica wick?
Why is my vape cotton burning?
How do you do a Scottish roll wick?
How do you build and wick an RTA?
- 1 – Keep Your Cotton Fluffy. ...
- 2 – Think About Your PG/VG Ratio and Don't Use Too Much Cotton. ...
- 3 – Give Your Wick a “Bowl Haircut” Around the RTA Deck. ...
- 4 – Don't Block the Juice Channels With Your Cotton. ...
- 5 – Keep Your Cotton Away from the Airhole.
DIY vape juice: be the maker and vaper
DIY vape juice is the homemade version of retail e-liquid. The same ingredients are used, but with infinite flexibility and customization. DIY e-liquid is a creative and cost-saving solution to the growing uncertainty surrounding vaping in 2020.
The easiest way to make vape juice
In the simplest terms, making your own e-liquid involves mixing together the main elements that make up e-juice: base liquid of PG and VG, nicotine, and flavor concentrates. You don’t necessarily need all of these, for instance, if you prefer your e-liquid to be nicotine-free or even unflavored.
Methods to mix DIY e-juice: weight and volume
There are two ways to mix DIY e-juice, and each comes with a set of pros and cons.
What do you need to make your own vape juice?
Regardless of the method you are going to use to make your e-liquid, and your preferences for what you would like to vape in the end, you will need the essential vape juice ingredients and DIY supplies. Here is your checklist:
Ingredients to avoid
Here’s a list of ingredients that people often wonder if they should use in their vape juice, but they absolutely shouldn’t:
DIY vape juice kits
If you’d prefer to get all your DIY supplies in a bundle, there are many kits out there to choose from. Most beginner DIY kits will come with all the essentials you need to get started.
E-juice calculators: an essential tool
If you want to mix accurately and have replicable results, you will need to use a vape juice calculator. A calculator simplifies the whole process by giving you all the info you need, be it the amount of nicotine needed to reach your favorite strength, or how much from each ingredient you will need to end up with a bottle of tasty 70/30 e-juice.
What is DIY Ejuice?
DIY Ejuice is literally a homemade version of the stuff that you normally buy in stores. The only difference is that you aren’t paying a premium for a fancy package, a designer label, and a slick marketing campaign.
What Are the Advantages to Making Your Own Vape Juice?
Still not quite sure? We understand your apprehension. But, believe us, provided you follow some common-sense guidelines, there is nothing to worry about. Here are some great reasons to consider making your own DIY Ejuice: –
How to Make Vape Juice
We are going to be upfront and honest. You will need to be prepared, and it does take a little time to get it exactly right. It can all be a little daunting.
Important DIY Juice Tips
Ok, before we get mixing, there are a few things that it is important to know. We want you to fall in love with mixing your own vape juices and want you to be successful the first time. Use the benefit of our experience, here are some great tips: –
Conclusion
Making your own DIY e-liquid is a hobby within a hobby. It won’t take long for you to be ‘bitten by the bug’. Once you get the hang of it, you’ll be spending your days looking for that secret ingredient that will make your homemade vape juice into an exact (or better) copy of the store-bought stuff.
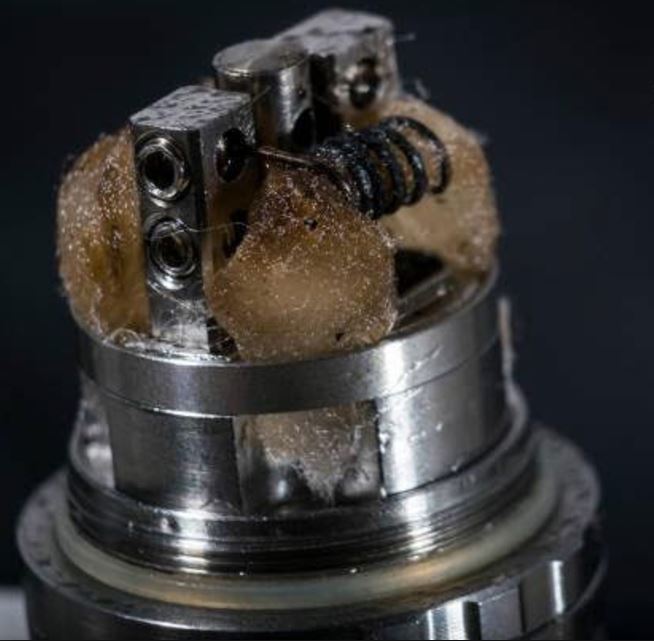
Measuring
Properly measuring your cotton before wicking can make a big difference. In general, you want your piece of organic wick two be roughly 1.5 – 2 times the width of the coil. Length doesn’t matter too much here — but ideally, you’d like your cotton to be 2-3 times the size of the deck you’re using.
Tapering
Tapering is a technique that has quickly caught on within the vape community. In fact, it’s become so popular that you can purchase pre-tapered organic cotton for your builds! But don’t waste your money here, tapering cotton is as simple as 1-2-3.
Feeding
Next, you’ll need to take one end of your hand-tapered cotton and insert it into the coil (doesn’t matter which side you start with). Pull the piece completely through, until it has been centered, like this:
Brushing
This step isn’t necessary, but it help increase the absorbent surface area on each side. To brush your cotton, simply take a small builder’s rod or allen key tool (here I use the Hex tool from the Twisted Messes Squared…), and proceed to pull the rod through the cotton on both sides (like you’re brushing your hair).
Tucking
Finally, take one side of your cotton, and loop it into your deck. Now repeat on the other side. After you’ve tucked both sides, “poof” each side upward slightly with your building tool.
Conclusion
Wicking can take some practice to perfect. Having to much cotton will “snuff” out your build, and kill the performance (flavor and cloud production). Too little wick, and you’ll be left with an airy, flavorless vape. Follow the steps above, and take your time — the more you re-wick, the better you’ll get!
Wicking Material
Today there are half a dozen or so different wicking materials in use. Each one has its own pros and cons. Here’s a quick overview of your options for wicking:
Installing Your Wick
For the purposes of this tutorial we will use organic cotton as our example. Since cotton is one of the most popular wicks, and other wick types tend to mimic the look and feel of cotton, this is a good place to begin.
Other Techniques
There are certainly other techniques out there to help you with wicking. If you choose to purchase wicks such as ekowool or stainless steel that come in a rigid mesh form, you may want to wrap your coil around the mesh when you are building instead of building the coil separately.
Maintenance
Now that you’ve got the hang of wicking your own vape, it’s time to talk about maintenance. Each of the above wicking materials has its own lifespan, but you need to be paying attention to your wicks so you’ll know when their time is up.
VaporFi
If you’re ready to start experimenting with wicking your own coils and creating exciting new vapor builds, check out VaporFi’s Venom Builder Bundle today! You’ll get all kinds of goodies that are perfect for wrapping your first coils and rolling your first wicks at a price you’ll love!
Why build vape coils?
Building your own coils puts you in the driver’s seat. Rather than buying disposable coil heads every week, you can make your own. It’s a fun hobby that vapers not only take pride in, but get to enjoy the fruits of their labor. The way to get good at it is through practice.
Supplies to wrap a vape coil
While there are many types of vape tools and accessories you can use to wrap a vape coil, it’s best to keep it simple. There are plenty of good coil building kits on the market that supply you with everything you need, but you can also buy these things a la carte, or maybe you even have these supplies on hand already.
Micro vs macro coils
Micro and macro coils are created by taking a single piece of wire and wrapping it around a screwdriver, drill bit, or coil jig. The difference between a micro and a macro coil is the inner diameter of the coil. It’s that simple.
How to use a coil jig
Coil jigs are tools that help you wrap coils consistently by guiding the wire while it is getting wrapped on a rod. They are very useful tools, and they will help you make perfect coils every time with minimal effort.
Single vs dual coils
You might have noticed that the decks of many atomizers are designed for two coils, i.e. they are made for dual-coil builds. Not all atomizers allow for both, and for those that do, you will usually get better performance with one of the two options.
How to build a coil for an RDA
Building for RDAs is usually a straightforward process. First, examine the deck and see if it is a dual or a single-coil atomizer. Then check the size of the deck and see how large your build can be—you don’t want your coils to touch the top cap as this will cause a sort.
How to build a coil for an RBA or an RTA
An RTA, as well as an RBA section of a sub ohm tank, will come with certain limitations. In most cases, there is not enough space in the deck for larger builds. Use your coil jig as a reference and see how big a coil you can get away with.
What are Candle Wicks Made of?
Before we get into how to make a candle wick, you should know what commercial candle wicks are made from so you know what your options are.
How Many Wicks per Candle?
For any candle under 3.5 inches in diameter, you can just use one of your wicks. After you hit 4 inches in diameter, add a wick per inch. A 4-inch candle gets 2 wicks. a 5-inch candle needs 3. Keep this up for whatever size of candle you decide to make with your homemade wicks.
Why Trim Candle Wicks?
The main reason to trim candle wicks is so you get a longer burn time and less soot. A wick that is too long can’t draw wax up to the end and so the wick itself begins to burn rather than the fuel.
Supplies Needed
Now, it’s time for our supplies. For the first set of instructions, you will need the following:
How to Make Candle Wicks – Cotton
Use your ruler and scissors to cut your wicks. If you know what size of a mold you will be using, you want a few inches longer than the mold. If you are using a jar, you want at least an inch above the top so you can secure your wicks.
Final Thoughts
I hope you enjoyed this tutorial. Personally, I love not spending money on wicks that could be used for wax. If you found this helpful, please share this tutorial with your friends.