Single Coil: You cut yourself about a 4-6inch piece of kanthal wire, wrap to your preferred wraps, install your coil onto your RDA, RTA or RBA, make the needed adjustments, wick your coil, saturate your coil with your eliquid and you’re all good to go.

How to build your own vape mod coil?
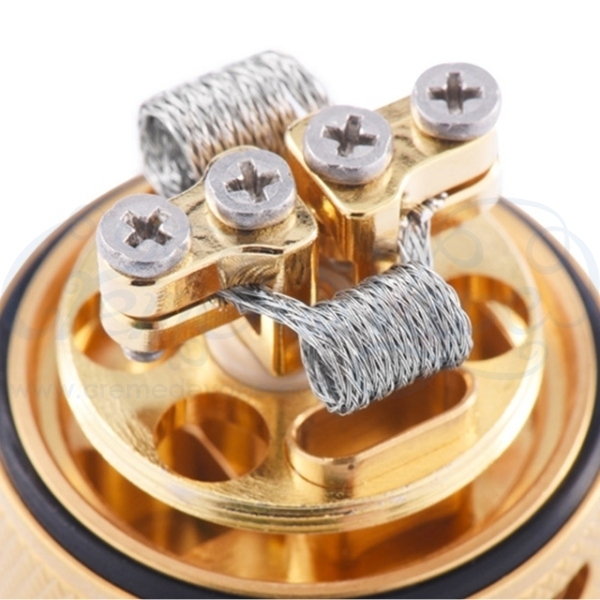
Build your own vape mod coil easily. First, look at the deck to check is it a single coil or dual coil atomizer? Be sure about the size that your coil. It may cause the short circuit in case it touches the top cap. Check post positioning to see whether it is in the same direction or other. Build your first RDA coils for your atomizer.
How to wrap vape coils?
For more info, watch Rip Trippers tutorial on how to build a parallel coil by hand. For even better results you can use a coil jig: just wrap the first coil using the jig’s guide, and manually wrap the second coil in between the gaps. Wrapping vape coils can appear to be much more difficult than it really is.
Why do vapers build vape coils?
Vapers are building vape coils as a hobby for enhancing and controlling the vape taste and feel. Often vapers take pride in building their own coil. Their dedication and labor results in a successful coil building. With every successful attempt, their coil building skill improves.
How do you make a single coil coil?
Single Coil: You cut yourself about a 4-6inch piece of kanthal wire, wrap to your preferred wraps, install your coil onto your RDA, RTA or RBA, make the needed adjustments, wick your coil, saturate your coil with your eliquid and you’re all good to go.

How do you make a homemade vape coil?
6:4711:11COIL BUILDING 101 - HOW TO MAKE VAPE COILS FOR BEGINNERSYouTubeStart of suggested clipEnd of suggested clipThe fibers of the cotton are flowing. Okay. So this one you want to eyeball it maybe say rightMoreThe fibers of the cotton are flowing. Okay. So this one you want to eyeball it maybe say right around there you cut it right cut yourself a nice strip. Just like that then you want to take this strip.
How do you make twisted coils?
9:5924:03Twisted Coil Build Tutorial - YouTubeYouTubeStart of suggested clipEnd of suggested clipThis is to hold it down and then you just start twisting. You want to keep them as close together asMoreThis is to hold it down and then you just start twisting. You want to keep them as close together as possible so that's one two three four five and six now it is gonna be a little bit springy.
Is it cheaper to build your own coils?
Another good thing about making coils yourself is that it's generally cheaper. For example, a dripper uses strips of cotton instead of a conventional coil. Buying all the materials to pack and create a coil is also considerably cheaper if you're making them yourself.
How do you wrap your own coils?
4:1710:47The Vape Coil Building Tutorial For Beginners - YouTubeYouTubeStart of suggested clipEnd of suggested clipNext insert the post into the corresponding three millimeter post hole in the cap. Now you're goingMoreNext insert the post into the corresponding three millimeter post hole in the cap. Now you're going to begin slowly twisting the cap clockwise. So it catches the wire and starts wrapping.
What is a Clapton coil?
Clapton Coils are a small gauge wire wrapped around another larger gauge wire in a perpendicular way. One wire is coiled tightly over the other. You get your thicker coil result by wrapping a 24 or 26 gauge vape wire in a 30 or 32 gauge. Surface area shoots up (and so does flavour production).
What is alien Clapton coil?
An Alien Clapton, usually referred to as an Alien, is a de-cored Clapton wrapped around a multi-strand core. It is similar to a fused Clapton, except the outer wrap has a very distinct texture. Aliens have a slower ramp-up time than fused Claptons due to their larger surface area.
Can you make a coil for a vape?
Building your own coils puts you in the driver's seat. Rather than buying disposable coil heads every week, you can make your own. It's a fun hobby that vapers not only take pride in, but get to enjoy the fruits of their labor. The way to get good at it is through practice.
What is the best ohms for vaping?
The standard or regular level of ohm when it comes to vaping and your clearomizer is between 2.4 and 2.8. This is by far the most common ohm range chosen by those looking for replacement coils, with the most commonly chosen being 2.5. This standard level tends to offer the most consistent level for your vape.
What is the best coils for flavor?
The best ones to go for flavour wise are clapton, titanium (if you prefer vaping with TC mode) or an Alien coil. The sweet spot for getting a balance of vapour and flavour is around 0.3ohms. Depending on your coil choice you'll want to up the wattage from anywhere between 50 and 100 watts.
How many wraps should my coil be?
How many coil wraps do I need? This depends completely on what type of coil you're building, your target resistance and even how much flavor you want from your coil. We'd usually suggest sticking to around 6 wraps as this will give you a good cross sectional surface area with decent flavor.
What does more wraps on a coil do?
HOW DOES THE NUMBER OF WRAPS AFFECT MY COIL? The more wraps, the higher the resistance, which goes on to affect flavour and cloud production. 8 wraps is a good starting point, but you can wrap your wire around more times if you want a different resistance.
What wire is used for vape coils?
KanthalKanthal is the most common wire used for vaping, and is a ferritic iron, chromium-aluminium alloy. Because of its inexpensive price, wide availability, and resistance to oxidation kanthal is a great material for building coils.
How to build a coil for a RDA?
First, examine the deck and see if it is a dual or a single-coil atomizer. Then check the size of the deck and see how large your build can be—you don’t want your coils to touch the top cap as this will cause a sort.
Who makes coil jigs?
Some of the best-known coil jigs are manufactured by Coil Master, UD, and Kuro Concepts. Wrapping coils using a coil jig is a fairly straightforward process. If you want to learn more, watch Sherlock Hohms’ video where he shows how to easily wrap a 2.5 mm coil using a coil jig.
How are micro and macro coils created?
Micro and macro coils are created by taking a single piece of wire and wrapping it around a screwdriver, drill bit, or coil jig. The difference between a micro and a macro coil is the inner diameter of the coil. It’s that simple.
What is macro coil?
Macro: a macro coil build is a coil that has an inner diameter that’s 2.5 mm and above. The bigger the inner diameter of the vape coil, the higher its resistance, and vice versa. Likewise, the thicker the gauge of wire used, the lower the resistance will be.
Why do you need to have two coils?
When doing a dual coil build, it’s essential for both coils to be identical in size and form, to ensure that they heat up properly. Dual-coil builds obviously create more vapor than a single coil of the same specs, but require double the power to perform.
What do you use to pinch coils?
Wire: any of the vaping wires would do. Flush cutters: wire cutters that can cut close in small spaces. Ceramic tweezers: to pinch your coils while pulsing. Fine tip tweezers: to fluff your cotton and place it inside the wick ports. Small metal rod: a small screwdriver, or coiling tool.
How to save money on vaping?
One of the best ways to save money in vaping is to build your own coils. Rather than buying disposable coil heads every week, you can make your own. It’s a fun hobby that vapers not only take pride in, but get to enjoy the fruits of their labor. The way to get good at it is through practice. Although, it’s perfectly reasonable for first-time ...
What do you need to make coils?
To start building your own coils from scratch, you’ll need to following items. Fingernail clippers/thin wire cutter. Precision screwdriver set. Kuro Koiler Tool (which I suggest) A pair of scissors for cutting your cotton. An Ohms Reader is recommended but not required if you are using a regulated mod. Kanthal Wire.
What is coil building?
Coil Building is the art in which you build your own coil put it in your RDA, RTA or RBA, wick it and thus create your own, bespoke coil.
Is a twisted coil faster than a clapton coil?
This coil takes a lot of patience and a bit more time than even the Twisted Coil but once you have done a few Clap ton Coils then you will be faster. In addition to being faster, you will get great flavor and cloud production from the Clapton. You install a Clapton the same as the other coils.
Can cloud chasers build their own coils?
And the reasons why are myriad; some prefer the flavor, others enjoy the craft. Any cloud-chaser worth their salt will almost certainly build their own coils — this is the only true path to truly GIGANTIC cloud plumes. It’s also A LOT cheaper than buying pre-made coils from vape brands like SMOK for use inside a sub-ohm tank.
Why do vapers not know coil building?
The reason being is that several vapers are actually unaware of what coil building is and how it’s done. Some vapers may hear of coil building but think it’s something that’s impossible for them to do themselves. Having the right knowledge is obviously important but using the right materials and tools is even more crucial.
What is a coil jig?
Coil Jig is a vape tool that helps wrap the coil consistently. Further, it guides the wire to wrap on the rod properly. It is a useful tool to build coils with minimum effort.
How many slots are there in a dual coil atomizer?
In the dual coil atomizers, one must check for the positive and negative slots. There are two positive and negative slots for the dual coil building. In dual atomizers, the airflow remains on the side to reach both the coils equally.
What is coil resistance?
Coil resistance decides the power of the vape device and the amount of power it will draw from the battery. A low resistance draws high power from the battery hampering the safety of it. It can cause a battery explosion. Testing the resistance and identifying the problems prior to using the coil is a must.
What is macro coil?
Macro coil builds: Macro coil builds are the coils with an inner diameter of more than 2.5mm. The bigger inner diameter has a higher resistance and vice versa. However, one can go for a Clapton coil build. Twist two different wire strands against each other to form this coil.
Can you build your own coil?
Own coil building is easy than it looks. In this current post, you have seen the way you can build your own coil. Building a coil can be challenging, especially if you try building complex coils. You need different drills and tools to build such coils.
Is coil building good for vaping?
Coil building is very possible for anyone seeking to take their vaping experience to the next level and It can be incredibly rewarding to take the first drag of your very own build. A perfect coil build needs practice and dedication.
Step 2: Clean Deck
Make sure the deck of the RDA is clean of any previous coils, cotton, or juice.
Step 5: Placing the Coils Into RDA
Insert one leg of one coil into the outside post hole of RDA *Caution: Make sure the coil is not touching either post
Step 6: Test the Coils
Activate the E-Cig to test the coils. Look at the coils, if they do not heat up from the center outwards and evenly between both coil adjustments will be required
Step 7: Trim All Excess Leeds
Trim all excess leads using the wire cutter as close to the post that they are connected to.
Step 8: Placing Cotton
From the organic cotton acquire a 2x2 inch section and tear in half. One half will be used for each coil.
Step 9: Saturate Cotton
Saturate cotton in E-Juice and let sit for approximately 5 minutes. *Note: adjust cotton back down into the deck well of RDA if it swells after saturation
Step 10: Put on the RDA Top Cap and Enjoy!
Place the RDA's top cap in place. You are now ready to enjoy a fresh build.
