1. Take apart tape player (or whatever other old electrical item you found/have) 2. Save the pieces you wish to use (also save other cool looking pieces for future projects) 3. Apply saved pieces to the sonic screwdriver!
Full Answer
What kind of sensors can you put in a sonic screwdriver?
Inexpensive accelerometers, altitude sensors, barometric pressure sensors, GPS sensors, etc. are all readily available and you can make a custom Sonic Screwdriver to house whatever sensors you want. Let's get started! "They're scientific instruments, not water pistols!"
How do you make a sonic emitter?
The emitter was made from a fish tank marble thing and a brass piece from a hose attachment. I epoxied them together. As this sonic can extend ( similar to the 10th doctors) I made a piece out of two sizes of tubing that the emitter screws onto. Into one side of that I drilled a hole for a bolt to go through.
Is the sonic screwdriver a trademark?
First and foremost let me start by saying that a Sonic Screwdriver is a trademark item of Doctor Who and the BBC. OK hopefully that covers my butt legally lol.
Do you have your own sonic driver?
You officially have your own SONIC SCREWDRIVER!!! I think for not having to do any soldering or electrical work it turned out pretty nice. Now a few things to remember here. 1. it lights up but because the led cover and the hole in the electrical holder allow the light from the LED pen light to shine through.
See more

How do you make a sonic screwdriver at home?
1:0111:56Make a Sonic Screwdriver (Doctor Who) - DIY Prop Shop - YouTubeYouTubeStart of suggested clipEnd of suggested clipThis is permanent marker. It's a little thicker. Yeah if you don't want to pick up some PVC pipeMoreThis is permanent marker. It's a little thicker. Yeah if you don't want to pick up some PVC pipe like this is all just leftover scraps they're only a couple bucks apiece usually.
Can you make a real sonic screwdriver?
A team of physicists at Dundee University have designed and built their own sonic screwdriver. As Andrew Anderson reports, it is hoped it will help in complex ultrasound surgery.
What does the sonic screwdriver not work on?
The sonic screwdriver is unable to open a "deadlock seal", used as a plot device to prevent an easy solution. Russell T Davies once mentioned that he would never make the sonic screwdriver the solution to an episode.
How do you use a sonic screwdriver?
To lock the Sonic Screwdriver, press the button four times quickly and enter any three digit Lock Code at the spoken prompt. To enter the desired three digit Lock Code, press the button rapidly to count out the first number, then pause for the Sonic Screwdriver to confirm it.
How do you make a sonic screwdriver sound effect?
1:055:19Sonic Screwdriver Sounds by Arduino and ATTiny85 - YouTubeYouTubeStart of suggested clipEnd of suggested clipSo what I do is I use audacity cleanup a downloaded WAV file or whatever the sonic screwdriver IMoreSo what I do is I use audacity cleanup a downloaded WAV file or whatever the sonic screwdriver I have to trim it down to just under a second of the actual sound file.
What does Tardis stand for?
Time And Relative Dimensions In SpaceThe TARDIS is the Doctor's method of travel through both time and space - all Gallifreyan Time Lords use TARDISes for getting from A to B - and from then to now. And TARDIS means? TARDIS, of course, stands for Time And Relative Dimensions In Space. Or Time and Relative Dimension in Space, if you're a purist.
What is the Doctor's real name?
John Smith. The Doctor's most common alias (apart from the Doctor, obviously), this is his standard pseudonym on Earth.
Who will be the 14th Doctor?
Ncuti GatwaDoctor Who casts Sex Education's Ncuti Gatwa as 14th Doctor - Polygon.
Does Doctor Who have two hearts?
At the hospital, Doctor Henderson discovers the Doctor's blood supply is different and that he has two hearts. According to the Heart article from the TARDIS wiki, The Edge of Destruction and The Wheel in Space both make the mistake of saying that the Doctor only has one heart.
How do you make a sonic screwdriver Dalek Mod?
0:271:29Sonic Screwdriver in Minecraft - Dalek Mod Crafting Recipes - YouTubeYouTubeStart of suggested clipEnd of suggested clipAnd then melt the titanium ore because you're gonna need that for a screwdriver. Now. More you alsoMoreAnd then melt the titanium ore because you're gonna need that for a screwdriver. Now. More you also need a lapis that's a lie.
Does the sonic screwdriver work?
0:204:08Can DOCTOR WHO's Sonic Screwdriver Actually Be ... - YouTubeYouTubeStart of suggested clipEnd of suggested clipIt can destroy stuff and unlock locks. And heal minor injuries. But most importantly for ourMoreIt can destroy stuff and unlock locks. And heal minor injuries. But most importantly for our purposes. It can manipulate objects at a distance yep.
How did the Doctor get his sonic screwdriver?
The Doctor produced it from his pocket to open a black metal box in episode one of Fury From The Deep, a serial now sadly missing from the archives. Troughton didn't rely on the sonic screwdriver as much as his successor, the gadget-loving Jon Pertwee.
What is the battery compartment on a Sonic?
The battery compartment of this sonic consists of a piece of 4" black pipe with an aluminum sleeve around it, a brass flare nut with a battery contact soldered in (see sonic 3.0), and a piece of plastic derlin at the top with a second battery contact to isolate the positive connection. This type of battery compartment is quick and easy to build and better instructions will be included with the next sonic I post.
What is the front end of a sonic?
The front end of this sonic is a piece of brass tube with a floral bead epoxied on that slides through a custom cut piece of aluminum. The aluminum was cut on a lathe. Behind the marble sits a white led and an IR led to light up and turn tvs on and off.
How many times did I cast a sonic claw?
The claws were an interesting process. I first sculpted one in clay on the side of the sonic, removed it, molded it and cast it 4 times in plastic resin. After that was done I placed the four claws around the handle with a bit of glue, made the front half of the claws and then sculpted more clay around the claws in place.
How to make it
Infuse vodka with rokz Citrus Blueberry Infusion Kit (ideal infusing time – 4 days).
Sonic Screwdriver
Fresh blueberry flavor with a hint of lemon. Just add vodka, gin, u0003tequila or wine,u0003 and infuse 2-4 days.
Step 1: The Innards
THE CIRCUIT This is the circuit I used for both the sonic sound as well as for the LED. The diode opposite of the LED, actually is a buzzer/small LED. I decided not to solder the components onto a board die to the fact that it would take up a bit more room. I used a switch that closed the circuit when released as the on/off switch.
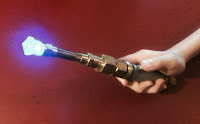
Step 2: The Emitter
The emitter was made from a fish tank marble thing and a brass piece from a hose attachment. I epoxied them together. As this sonic can extend ( similar to the 10th doctors) I made a piece out of two sizes of tubing that the emitter screws onto. Into one side of that I drilled a hole for a bolt to go through.
Step 3: The Handle
The handle was a piece of aluminum tubing that the electronics sleeve and the emitter neck could fit in. On one side I drilled three holes, on the other I drilled a bunch of holes in a row, then filed the edges to make a slot. The electrical sleeve is held in by three screws (acting as set screws). The emitter has a bolt going through the slot.
Step 1: Materials
The materials come to about $200, but it depends on where you get them and what you might already have. I put the Adafruit links for a lot of the different electronics. Adafruit is sort of my go to for arduino tech.
Step 3: Making the Case
Originally, I wanted to make the casing for the tech out of different metal pipes like copper or bronze with maybe some steel or aluminum pieces so it would be sort of steampunk but modern. However, I didn't think the tech would like being housed in a metal case (especially the compass), and I needed to be able to cut and shape the pipes.
Step 4: Putting the Tech in the Case
Take the Feather and all the sensors that are connected to it and insert the foot long labeled wires from the end of the wiring step into the square hole in the longer (8 inch) PVC section.
Step 5: Wiring: Part 2
Solder the following components to the wires threaded through the PVC. Trim the foot long wires if they are super long. Make them just long enough so you can access them and solder components to them.
Step 6: Code
Apologies in advance. My code is a monstrous, duct taped splice of different bits of code that makes Frankenstein look like a single, coherent, put-together guy. I tried to show where I got all the different bits of code though. A lot of it is from Adafruit library examples.
Step 7: Using It
The slide switch turns it on and off. The potentiometer allows you to switch between settings.
Step 2: Tools and Materials
The main materials used in the construction of this screwdriver are Aluminum, Brass and wood. The wood body was made from a piece of 1 1/4" diameter hardwood dowel I found in my garage. Aluminum and brass round stock and brass sheet can be ordered from Online Metals. The only other material used is a small section of 1/2" diameter acrylic tube.
Step 3: Making the Housing
I made the main body from a section of hardwood dowel I found in my garage. I bored out the inside to 1" diameter and then turned down the outer diameter. The Aluminum pieces were turned on my lathe. The grooves were cut using a cut off tool and the center holes were drilled and bored out using a boring bar.
Step 5: The Detail Bit That Wasn't Used
This was a really interesting bit that I made that I ended up not using but I thought it would maybe be useful if someone else wanted to use it in their own design.
Step 6: Electronics
When designing the electronics for this I wanted to use as many off the shelf parts as possible so anyone could build it and easily modify it. The way the system works is the Arduino reads the sensors and spits out a value to the OpenLog to log it on the micro SD card.
Step 7: Programming and Data Logging
Programming is super simple if you're already familiar with Arduino. Just remove the OpenLog from the connector and connect a FTDI breakout board (or cable) to the header pins on the board to upload your code. When you're finished uploading the code just plug the OpenLog board back into the header.
Step 8: The Young Time Lord Inspects His New Sonic Screwdriver!
Once I got everything properly tested and fit together I presented the finished Sonic Screwdriver to Sam and he was absolutely thrilled. He had a lot of fun helping build it - he absolutely loves electronics, building things and working in the garage with me.
What is a Sonic Screwdriver?
The sonic screwdriver vape pen started as a comic mode to mimic Dr.Who from sonic the hedgehog movie , and from there, it grew to become one of the most liked vape pens within the vaping community. Even though it is not very common and available, it still stands as one of the unique devices introduced into the vape market.
Can you use a vape tank for an extended period?
Vape tanks cannot be used for an extended period, but you have to ensure that you properly care for them at all times. You first have to remove the protective ring and the plastic cap. Take a keen look at your wicks to ensure no burn marks on the wick. If anything seems off, you will need a new tank.