- Method 1 Disassembling the Vape Download Article. Unscrew the tank from the body of the vape to expose your coil. ...
- Method 2 Adding a New Coil Download Article. Pre-saturate your coil with 5-8 drops of vape juice. ...
- Method 3 Knowing When to Replace the Coil Download Article. Replace the coil every 1-2 weeks on average. ...
- When the pod is empty, remove it from the device and hold it upside down.
- Twist the pod's base to loosen and remove it. ...
- Pull the old coil out of the pod.
- Push a new coil into the pod.
- Replace the pod's base and refill the pod.
How often should you change the coil in your vape?
Using your vape more frequently means you’ll need to change the coil more often, but even if you rarely vape, your coil will still need to be replaced at least once a month. How do you know when your vape coil needs changing?
How do you know when to change your coil vape?
When to Change Your Vape Coil?
- When to Change Vape Coils. When your coil has snapped or when it has started to produce less flavour each passing day, that’s when you know it is due for ...
- Replacing Your Vape Coil. ...
- Disposable Coil Heads. ...
- Replaceable Coils. ...
- Pre-Wound Coils. ...
When do you change the coil on your vape?
When you should replace your coil largely depends on how often you use it. Typically 1 coil lasts about 2 weeks. If you use your vape very frequently, you’ll have to change the coil more often, potentially every week. If you occasionally use your vape, you can go 2-3 weeks without changing the coil.
How to know when to replace coil vape?
- Chain-vaping
- Using liquids with higher VG content
- Using a higher wattage
- Using juice that is very thick
- Using a higher temperature when vaping
How often should you change the coil in a vape?
every four weeksIf you're a heavy vaper, using your e-cig many times a day, you might need to change the coil every couple of days. If you are a regular vaper but not particularly heavy, it could last a week or two. Irregular or casual vapers might find they need only change their coil every four weeks.
How do I know when my vape coil needs changing?
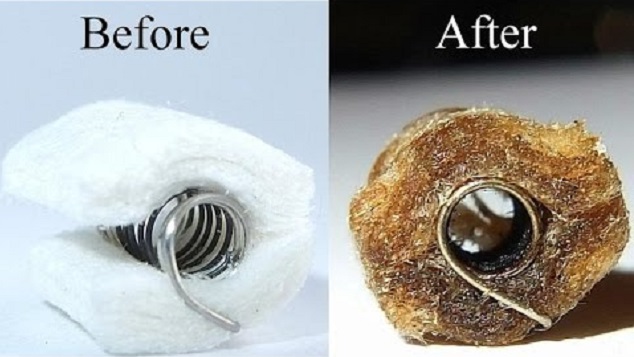
Signs it's time to change your vape coilA burning taste. Vaping a dead coil will eventually result in an acrid, burning taste. ... Gurgling sounds. Vapes shouldn't gurgle. ... Weak or “off” e-Juice flavor. This often precedes a burnt taste. ... Low vapor production. The vapor produced by your coil will gradually lessen with time.
Does a tank need to be empty to change a coil?
You want to replace the coil when the tank is empty, so empty any remaining e-liquid from the tank before adding your new coil. It's important to give the wick time to soak and absorb plenty of e-liquid before you start vaping on your new coil. If you don't, the coil is likely to burn out.
When should I replace my coil in my tank?
1:234:26When to change your vape coil - YouTubeYouTubeStart of suggested clipEnd of suggested clipFirst pop a few drops onto each liquid port on the side. And one down the middle if this doesn'tMoreFirst pop a few drops onto each liquid port on the side. And one down the middle if this doesn't help then it's time to swap it out the next sign is if your vape coil tastes burnt.
Why does my coil taste burnt after 2 days?
It tastes burnt because the wick inside your atomizer coil has dried out and burned up when it was heated. The wick is the part of your vaporizer that soaks up the eliquid from the tank. The wick holds onto this eliquid before it is turned into vapor when the coil heats up.
Can I leave juice in my vape overnight?
Always store the vape with an empty tank, or store it with the mouthpiece upright to avoid leaking, and try to avoid storing it with liquid in the tank for long periods of time, as it could change the flavor. If you are a flavor chaser, you should avoid leaving vape juice in your tank for very long without use.
How do you remove a coil from a tank?
0:282:20How To Change Your VAPE Coils! - YouTubeYouTubeStart of suggested clipEnd of suggested clipAll you need to do is squeeze the bottle. First then insert it tilt it over and what you'll do isMoreAll you need to do is squeeze the bottle. First then insert it tilt it over and what you'll do is suck the juice back into the bottle as you're releasing it even if it's not a lot of juice.
Why is vape gurgling?
A pod vaping device, or pod begins gurgling because excess e-liquid is caught inside the pod's atomizer coil assembly. There's more e-liquid than the wick can hold, so you begin to hear a bubbling or gurgling sound when you inhale.
What happens if you dont change vape coil?
What happens if I don't change it? If you don't change your coil when it needs it, your vape juice will start to taste burnt. If it wears out, it will start to leak – you'll usually have changed it long before then.
How often should you vape a day?
There is no one answer to the question of how often you should vape, as it depends on a variety of factors. Some people may find that they enjoy vaping every day, while others may only want to vape occasionally. The most important thing is to figure out what works best for you and stick to it.
How many puffs does a vape coil last?
On average, a decently constructed coil for a sub-ohm tank should last you 4 days to 1 week. If you vape less because you cannot vape during work hours, or you do not vape throughout the day, then your coils are likely to last twice as long.
Can a burnt coil make you sick?
Depending on how bad the coil is burnt, you could end up choking or vomiting immediately. Depending on what kind of coil you are using they can produce some particles that stick to the vapor and end up ingested by the user when they are burned dry. Some have an allergy to these particles being created.
A Brief Atomizer Breakdown
To start things off, let’s go through a quick refresher course. What is an atomizer? Vape fans usually have a basic understanding of the term and h...
Other Atomizer Variations
As if cartomizers and clearomizers weren’t enough, there are also a couple other different types of atomizers. Certain atomizers come with multiple...
Replacing Your Cartomizer
As aforementioned, most cartomizers are disposable, which makes replacing them very simple. 1. Step One: Begin by removing the drip tip from your c...
Replacing Your Multiple Coil Atomizer
Multiple coil atomizers are great for those seeking a lavish, extra-indulgent vape experience. Changing the coils for this type of atomizer is much...
Replacing Your Top Coil Clearomizer
Top coil clearomizers are perfect for vape wizards seeking a cloud chasing experience that provides warm, flavorful vapor and thick, vibrant clouds...
Replacing Your Bottom Coil Clearomizer
Replacing a bottom coil clearomizer is much like replacing a top coil one, but with one extra benefit—you can do it without having to empty out y...
Replacing Your Sub-Ohm Atomizer
Sub-ohm tank atomizers provide cloud chasing experts with the thick, cool vapor they crave and the freedom to have extra control over their clouds....
How to replace coils in a vape?
Step One: Empty out your vape tank if necessary. Step Two: Unscrew the base from your tank. Step Three: Unscrew your coil, then separate the top portion of your tank so you can replace your coil. Step Four: Attach your new coil to your tank, then re-attach your atomizer parts in the reverse order you took them apart.
How long does a vape coil last?
The answer to this varies depending on how frequently you vape, but typically, the average lifespan of a coil is around two weeks (this can depend on a variety of aspects!).
How to change clearomizer coil?
Step One: Invert your clearomizer so it is upside-down. Step Two: Unscrew your base and atomizer head from the bottom. The stem will remain intact inside your clearomizer. Step Three: Screw on your new coil, and reattach the base and head in the reverse order you took them apart.
What is a top coil clearomizer?
Top coil clearomizers are perfect for vape wizards seeking a cloud chasing experience that provides warm, flavorful vapor and thick, vibrant clouds. Replacing a top coil clearomizer is quick and easy; once you learn the proper steps required to change out the coil, you’ll be able to perform the task in a flash.
How to disassemble a top coil clearomizer?
Step One: Begin by emptying out your tank. When disassembling a top coil clearomizer, the stem of the atomizer comes out along with the base and atomizer head, so starting with an empty tank ensures that you’re able to access the coil quickly and efficiently. Step Two: Next, unscrew the base and coil head. If done properly, the stem should come out ...
What is a multiple coil atomizer?
Multiple coil atomizers are great for those seeking a lavish, extra-indulgent vape experience. Changing the coils for this type of atomizer is much like changing the coils for any other atomizer, except you’ll be changing multiple coils instead of just replacing one.
What is the difference between a top coil and a bottom coil clearomizer?
Top coil clearomizers are filled from the top and result in warm, flavorful vapor. Bottom coil clearomizers are a bit harder to fill since the juice can’t be inserted from the top, but are undoubtedly worth the extra effort: they provide a unique throat hit that provides cool vapor of the highest quality.
