How do I change my vape coil?
2:055:16Vape Tutorial: How To Change Coils On Vape Tanks & ClearomizersYouTubeStart of suggested clipEnd of suggested clipSimply hold the chimney with one hand and twist the coil until it's removed with the other grab yourMoreSimply hold the chimney with one hand and twist the coil until it's removed with the other grab your replacement coil and thread it on to the base of the chimney.
How do I remove arc 5 lock?
Turn the arc 5 on by quickly pressing the power button five times, the screen will activate indicating the arc 5 has been switched on. Quickly press the power button five times to switch the arc 5 off, the screen will deactivate indicating the arc 5 has been switched off.
How do you change a coil without losing juice?
1:594:37How to change a coil with out losing your juice - YouTubeYouTubeStart of suggested clipEnd of suggested clipStart. If you're pushing it down to the side. It might block. So just fiddle around a bit. There weMoreStart. If you're pushing it down to the side. It might block. So just fiddle around a bit. There we go all the juice a little air I'm just for safety. Put it at the side.
How do I unscrew my vape tank?
Rubber gloves: Put on a pair of washing up gloves and try to unscrew the tank with them on. They increase grip and make it much easier. Rubber bands: Wrap a rubber band around the metal part of the tank. The increased grip will make it easier to unscrew in your hands.Oct 8, 2019
How do you change coils in Arc 5?
0:582:14TECC Arc 5S Kit Guide - YouTubeYouTubeStart of suggested clipEnd of suggested clipIn order to change your coil. Start by removing the base of your tank like. So then proceeded toMoreIn order to change your coil. Start by removing the base of your tank like. So then proceeded to unscrew your old coil rescrew in the new. Reassemble your tank finger tight.
Why is my arc mini vape not working?
Try cleaning the battery terminal and end of your clearomiser with a cotton bud. Another thing to check is that the tank or clearomiser is making contact with the battery terminal. If a previous tank has been screwed on too tightly, the battery pin may need adjusting to make a connection again.Jul 17, 2019
How do you know when a vape coil is bad?
5 Signs That Show It's Time To Change Your Vape CoilYour Vape Tastes Burnt. This is probably the most noticeable thing that tells you your coil needs replacing, and something most vapers will experience. ... Your E-Cigarette Is Gurgling. ... Your Vape Tastes 'Strange' ... Your Coil Is Used Up. ... E-Cigarette Leaks.May 31, 2017
Can you rinse a vape coil?
Let your coil soak in ethanol, vinegar, or cheap vodka for at least a couple of hours. Place it under the tap and rinse. Rinse once more with some distilled water. Blow air on the open side of your coil to force water to the wicking holes.
How long does vape coil last?
between 7 to 21 daysWhile the exact duration may differ from person to person depending on their personal vaping habits, most new coils are designed to last anywhere between 7 to 21 days. This varies depending on how well you care for and clean your device.Jan 29, 2021
How do you take apart a vape coil?
To remove the atomizer coil, unscrew it by twisting counterclockwise. To remove the glass, wiggle it gently to slide it off of the silicone or rubber o-ring holding it in place. To remove the mouthpiece, lift it straight up to pop it out of its socket.Mar 14, 2020
How do you open a vape coil?
You may want to wrap your device in a paper towel to keep your hands from getting e-Juice on them. Next, simply flip your tank upside down and twist counterclockwise to remove your tank.
A Brief Atomizer Breakdown
To start things off, let’s go through a quick refresher course. What is an atomizer? Vape fans usually have a basic understanding of the term and h...
Other Atomizer Variations
As if cartomizers and clearomizers weren’t enough, there are also a couple other different types of atomizers. Certain atomizers come with multiple...
Replacing Your Cartomizer
As aforementioned, most cartomizers are disposable, which makes replacing them very simple. 1. Step One: Begin by removing the drip tip from your c...
Replacing Your Multiple Coil Atomizer
Multiple coil atomizers are great for those seeking a lavish, extra-indulgent vape experience. Changing the coils for this type of atomizer is much...
Replacing Your Top Coil Clearomizer
Top coil clearomizers are perfect for vape wizards seeking a cloud chasing experience that provides warm, flavorful vapor and thick, vibrant clouds...
Replacing Your Bottom Coil Clearomizer
Replacing a bottom coil clearomizer is much like replacing a top coil one, but with one extra benefit—you can do it without having to empty out y...
Replacing Your Sub-Ohm Atomizer
Sub-ohm tank atomizers provide cloud chasing experts with the thick, cool vapor they crave and the freedom to have extra control over their clouds....
How to get vape juice out of tank?
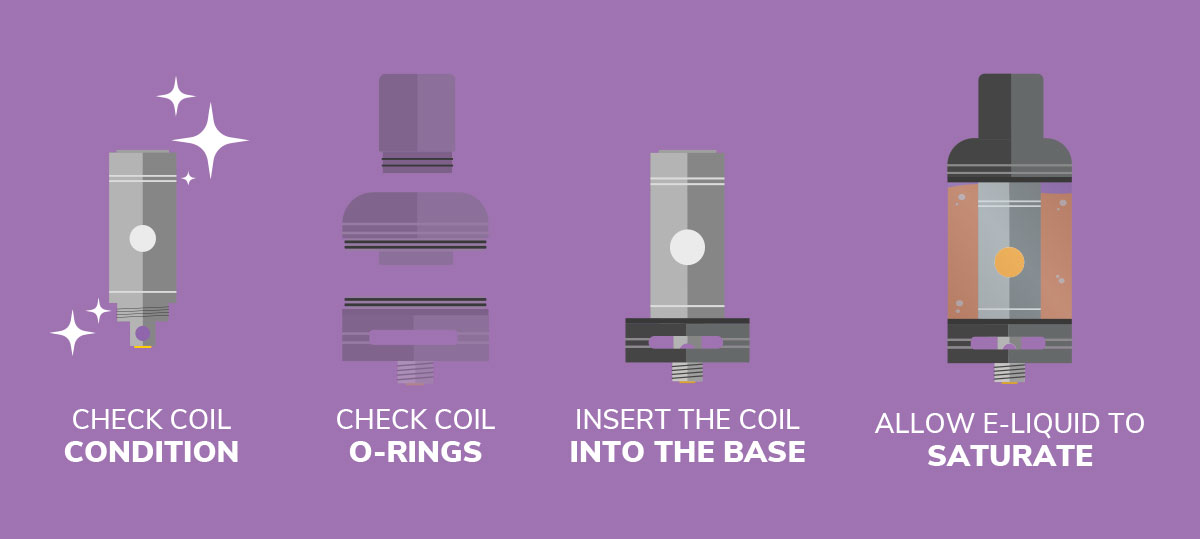
If there’s any vape juice still in your tank, dump it out. Next, unscrew the co il from the base of the vape by twisting it counterclockwise. Pre-saturate your new coil with 5 to 8 drops of vape juice so it won’t burn, then screw your new coil into place.
How to unscrew a vape tank?
Every vape setup is slightly different, but in general, you can easily unscrew the tank from the bottom section. Hold the tank upside down and twist the tank off using your hands. If there is juice in your tank already, you can use a paper towel to avoid getting your hands greasy.
Why does my coil clog up?
If it has a burnt aftertaste or if the flavor seems sour, it is time to change your coil. Over time the juice starts to clog up the coil. If you use sweet, sugary juices, they may clog up your coil more easily. The sweetener essentially caramelizes on the coil as it heats up.
How to get rid of burns in vape coil?
1. Pre-saturate your coil with 5-8 drops of vape juice. The cotton in your coil is brand new when you take it out of the package. If you place it directly onto your vape, it will start to burn. To avoid this, drip about 5 or so drops across the cotton from the vape juice bottle.
How to take off a vape coil?
The coil is also called an “atomizer head” or “replacement head.”. You can use your hands or a paper towel to take off the coil. Twist the coil counterclockwise until it comes off of the bottom of your vape. A paper towel will help keep your hands clean.
Can you replace a vape coil with fresh juice?
If there is any vape juice still in your tank, dump it out in your trash can. This way, you can replace it with fresh juice after you put on a fresh coil. It is helpful to replace your coil with as little vape juice remaining as possible.
Can you use more or less juice in a vape?
Use more or less juice, depending on the size of your coil. Make sure the coil you purchase is the right coil for your vape. Read your instructions to determine the type of coil or bring your tank to a local vape store.
How to replace atomizer head on Arc 5?
To replace the atomizer head, unscrew the tank from the arc 5 battery. Turn the tank upside down, then unscrew the tank base from the glass section of the tank. Unscrew the atomizer head from the tank base and replace. Prime the new atomizer head by dripping a few drops of e-liquid into its central hole. Reassemble the tank and refit the 10 tank back onto the arc 5 battery.
What happens if you don't have an atomizer head on an Arc 5?
If no atomizer head is detected, the screen will display “No atomizer” and the arc 5 will refuse to power or produce any vapour. Ensure the atomizer head is fully screwed into the base of the tank then fit the tank back onto the battery. If the “No atomizer” message continues, replacing the atomizer head should allow normal operation to resume. To replace the atomizer head follow the steps outlined in Replacing the Atomizer Head on page 10.
How to clean arc 5 tank?
The arc 5 battery and tank connection can be cleaned by wiping down with tissue or a dry cloth. The CS Air Slim tank can be cleaned by removing it from the battery, unscrewing the tank base from the glass section of the tank then removing the atomizer head. The entire tank and base can now be cleaned under hot running water. Allow the tank to fully dry before refitting the atomizer head into the tank base. Reassemble the tank.
What happens if the temperature of the Arc 5 is too hot?
If the temperature of the arc 5 exceeds the maximum safe operating temperature, the screen will display “Device Too Hot” and the arc 5 will refuse to power or produce any vapour. Stop vaping and allow the arc 5 to cool down for normal operation to resume.
How to charge Arc 5?
The arc 5 is charged by connecting the charge port on the battery to a USB port or suitable wall adaptor with the supplied charging cable. The screen will display an animated battery icon while charging, once the battery is fully charged the screen will switch off completely.
How many watts does an Arc 5 battery use?
The wattage on the arc 5 battery is adjustable and can be set from 1-40 watts.The wattage is set to 40W out of the box, but we recommend reducing the wattage to 12W to prevent the atomizer head from burning prematurely. To set the correct wattage, ensure the arc 5 is switched on; then keep pressing the down adjustment button until the screen reads 12W. Lower wattage settings will give a cooler, less dense vapour. Higher wattage settings produce larger clouds of vapour, but setting the wattage too high can lead to poor
What happens if an atomizer short circuit occurs?
If an atomizer short circuit occurs, the screen will display “Atomizer short” and the arc 5 will refuse to power or produce any vapour. Replacing the atomizer head should allow normal operation to resume. To replace the atomizer head follow the steps outlined in Replacing the Atomizer 14 Head on page 10.
How to replace coils in a vape?
Step One: Empty out your vape tank if necessary. Step Two: Unscrew the base from your tank. Step Three: Unscrew your coil, then separate the top portion of your tank so you can replace your coil. Step Four: Attach your new coil to your tank, then re-attach your atomizer parts in the reverse order you took them apart.
How to change clearomizer coil?
Step One: Invert your clearomizer so it is upside-down. Step Two: Unscrew your base and atomizer head from the bottom. The stem will remain intact inside your clearomizer. Step Three: Screw on your new coil, and reattach the base and head in the reverse order you took them apart.
How to disassemble a top coil clearomizer?
Step One: Begin by emptying out your tank. When disassembling a top coil clearomizer, the stem of the atomizer comes out along with the base and atomizer head, so starting with an empty tank ensures that you’re able to access the coil quickly and efficiently. Step Two: Next, unscrew the base and coil head. If done properly, the stem should come out ...
What is a top coil clearomizer?
Top coil clearomizers are perfect for vape wizards seeking a cloud chasing experience that provides warm, flavorful vapor and thick, vibrant clouds. Replacing a top coil clearomizer is quick and easy; once you learn the proper steps required to change out the coil, you’ll be able to perform the task in a flash.
What is a multiple coil atomizer?
Multiple coil atomizers are great for those seeking a lavish, extra-indulgent vape experience. Changing the coils for this type of atomizer is much like changing the coils for any other atomizer, except you’ll be changing multiple coils instead of just replacing one.
How to use RBA?
To use an RBA, you must build your own coil (which means you will physically wrap the coil by hand), attach it to your atomizer, and insert your own wick for a one-of-a-kind vape experience. The final type of atomizer is the sub-ohm tank. Sub-ohm tank atomizers use coils that provide less than 1 ohm of resistance.
What is the difference between a top coil and a bottom coil clearomizer?
Top coil clearomizers are filled from the top and result in warm, flavorful vapor. Bottom coil clearomizers are a bit harder to fill since the juice can’t be inserted from the top, but are undoubtedly worth the extra effort: they provide a unique throat hit that provides cool vapor of the highest quality.
What is the Arc Sigma vape kit?
The arc Sigma vape kit is the new kid on the block. The latest addition to the arc family, this box mod vape kit offers a large battery, consistent vaping and an easy to use vape tank.
What vape tank does Wicked Arc 5 use?
The Totally Wicked arc 5 e-cigarette kit comes with the specially selected CS Air Slim vape tank. This tank has a 2ml e-liquid capacity and comes with a 1.5ohm atomizer. It has adjustable airflow and there is also an option to utilise 0.75ohm CS atomizer heads. This means that the device will perform well for those who are looking for denser vapour.
What vape kit comes with a GT Air?
The Totally Wicked arc GTi vape kit comes with the specially selected GT Air vape tank. With its push-fit atomizer changes, pin point airflow control and locking top fill, the GT Air Tank is the ideal match for the arc GTi. It uses GT atomizer heads which have an option for vapers who prefer to directly inhale as well as those who prefer a more restricted draw.
How long does it take for a vape battery to charge?
This means that your vape battery can go from empty to fully charged in just 1hr 30 minutes. There is also a whole host of vaping setting including temperature control and variable wattage up to 80W. The beauty of the Arc GTi battery is it can be as easy or as in-depth as you want it to be.
What is the GT Air Slim tank?
Along with the arc Sigma box mod, there is a new vape tank introduced. The GT Air Slim tank adds a touch of class to this already stunning vape kit. It is easy to use, easy to maintain and vapes exceptionally well.
What is CS Air Slim?
The CS Air Slim tank uses CS atomizer heads, has a sturdy construction and is the ideal match for the arc Slim. The refined airflow adjustment means you have more control over your vaping experience.
What is the Arc GTI?
The Arc GTi e-cig has all the standards we expect from a high quality e-cigarette. A 5 click on and off function allowing for safe storage of the vape mod, the ability to use the GTi whilst it is charging, stainless steel threads and a spring-loaded firing pin for durability and longevity.
How to prime a vape coil?
Priming Vape Coils. Step 1: When you’ve taken your coil out of its packaging, locate the exposed bits of cotton on the side. There are probably two, opposite each other, and they’ll most likely look like white circles. Step 2: Get your vape e-juice, and place a few drops on one of the cotton spots.
How does a sub ohm coil work?
For sub-ohm coils, there are two key steps you need to take part in: priming and then breaking in your coil.
How long does it take to prime a sub ohm battery?
Usually, pouring the liquid directly into the tank takes about 15 minutes for it to be ready, but priming it yourself reduces this down to less than 5 minutes. If you have a sub-ohm coil, it’s almost essential to prime it. Sub-ohm coils operate at a resistance of less than 1.0 ohm, drawing a lot of power from the battery.
What does MTL mean in a smoker?
MTL stands for ‘mouth to lung’ and these coils operate higher than 1 ohm. They’re the most common for those trying to quit smoking. To prime these, it’s even simpler. Step 1: You need to put the new coil in as normal, and make sure the tank has a good amount of liquid in, with the tank almost full.
Does priming a coil help with longevity?
Priming is essentially making sure the coil you use is fully soaked in e-liquid. This lets it have a more consistent taste, minimizing popping and dry hits . The design on some newer models takes longer for the e-liquid to be absorbed ...
Can you break in a sub ohm coil?
Breaking in a sub-ohm coil is very similar to letting a valve guitar amp heat up—you need to slowly get it ready to be used, rather than getting it to do its purpose straight away. Not breaking in can reduce the coil’s lifespan and give you unpleasant hits.
Baditude ECF Guru ECF Veteran
Cotton will start to get a nasty taste after 3 - 4 days use in a coil. That's the time to change out the wick.
edyle ECF Guru Verified Member ECF Veteran
I can't find the post, but someone recently posted a helpful YouTube video on how to change cotton in a Kanger Subtank coil. I had no idea it was so easy, and I'm going to try it on my old coils. I've saved the video for future reference. My question is: how do you know when you need to change the cotton vs.
DingerCPA Vaping Mistress Verified Member ECF Veteran
Thank you. I can't put my hands on the original packaging at the moment, but I could have sworn it said not to do dry burns, though. FYI I use the Subtank Nano with the iStick 30 if that matters.
Alien Traveler Vaping Master ECF Veteran
I have made/rewicked coils for Protank, but it is about the same thing.
erictho Super Member ECF Veteran
after dabbling a bit in rebuildable set ups although changing the wick boosts confidence i still would rather replace the whole she-bang after every 10mls rather than just replacing the cotton.
yuseffuhler Ultra Member
You can dry burn to clean most coils. Please do not do this in the subtank occ; you can melt the insulator really really easily. If the coil looks gunked up (visible crust all over it) replace it. Otherwise I'd leave it. Just don't dry burn. It will taste like monkey ...., and that whole tank of juice will taste like it too. Monkey ....
yuseffuhler Ultra Member
Thank you for the advice. I'm open to trying most flavors, but monkey .... is not among them.