Should you Soak Your coil before vaping?
For a vaper to get the most out of the experience, you must never forget to soak your coil. You could use this article as a reference on how to go about the process as we have outlined it more plainly.
How long should I soak a coil in a solvent?
But two hours is a good rule of thumb if you're in a hurry. After you're done soaking, remove the coil from the solvent and rinse it out in your sink. For scientific purposes, try placing a tupperware under your rinse-water to see what comes out. You probably also have some signs of gunk swirling in the solvent as well.
How do you clean a deconstructed vape coil?
Use a paper towel or your first-hand towel to gently wipe down your coil, along with the other parts of your deconstructed tank. If you prefer, you can lightly damp the towel with water to help remove the oily e-liquid. If you have a rebuildable coil with wicks that can be removed, do so now.
How long does it take for vape coils to fill up?
If you prime your coils before installation (as directed in the instructions — RTFM), you should be able to vape as soon as you fill the tank. However, if you do not prime your coil, it should take from 2 to 5 minutes (depending on the coil) to saturate.

How long should I let my vape coil soak?
around 5-10 minutesIt's always recommended to leave your coil to prime for as long as possible - anywhere between 5-30 minutes. The longer you leave it the better, but most coils should be ready to vape after around 5-10 minutes.
Can you soak a vape coil?
Once the vape coil is isolated, you'll soak it, as we discussed earlier. You can use warm water and dish soap, vinegar, baking soda, or grain alcohol, and you'll soak for as long as you think you need to (usually 1-2 hours, but a longer soaking session won't damage the coils).
How do you pre soak vape coils?
0:541:52Priming a vape coil in 2 minutes - YouTubeYouTubeStart of suggested clipEnd of suggested clipGet your either quid. And add a drop onto each of the liquid inlet holes add a few drops onto theMoreGet your either quid. And add a drop onto each of the liquid inlet holes add a few drops onto the wicking material down the middle hole put your vape coil in your tank fill your tank with the liquid.
How do you break in a new coil?
Here is how to make coils last longer by breaking them in gradually:When you start vaping, set the wattage to the lowest recommended setting.Take a few short vapes to slowly start to break in the coil.Increase the power by 5 watts.Take three normal vapes and increase power by 5 watts.More items...•
Can you clean a burnt vape coil?
So, carefully remove the coil from the hot water and submerge it in the cold water. With this, any remaining debris will fall off, and your coil will be clean again. If you have done this and still experience the annoying burnt taste vape, then you can clean it using vinegar or lemon juice in hot water.
What happens if you don't prime a coil?
What if I didn't prime my coil and it's burnt? Unfortunately, if you didn't prime your atomizer / coil properly and your wicking material is burnt, there is no way to bring it back. That taste will stay until you change your atomizer head containing a new coil.
Why is my vape burning my throat with new coil?
Some vapers are quick to blame it on a faulty coil, but new coils usually get burnt because they haven't been primed before use. By priming your coil, we basically mean preparing it and getting the wick nice and saturated with e-juice.
Why is my coil burning after 1 day?
Ensure Your Tank Is Properly Filled While this might seem obvious, the first port of call when your coil is burning is to ensure that it is properly saturated with e-liquid. Allowing your tank to run on empty while still vaping will inevitably cause dry burn, which can permanently damage the coil.
How long should I leave my vape coils in?
30 seconds to 2 minutes should be enough, especially if you’re priming the system. If you want to be sure, fill it all up and leave it for 5 minutes. I live my coils in my tank at least a half hour before trying to vape it but often I leave them for an hour to get well and truly soaked.
How long does it take for a vape to saturate?
However, if you do not prime your coil, it should take from 2 to 5 minutes (depending on the coil) to saturate. To keep from getting a dry hit, allow at least 5 minutes.
How do you know when it's time to change coils?
You will know when it’s time to change coils… you will notice that vaping doesn’t feel as “crisp” as it does with a new coil, and the vaping experience will deteriorate steadily as the coil ages. In over five years of vaping, I have yet to have. Continue Reading.
How long does it take to put a VG feed system together?
It also depends on if you put liquid on the fabric while putting it together. 30 seconds to 2 minutes should be enough, especially if you’re priming the system.
How long does it take for cotton to get juice?
It shouldn’t take more than a minute or two for the cotton to become saturated with juice. After that, you’re good to go, but it’s usually smart to start at a lower wattage and work your way up, to avoid scorching the cotton and causing a nasty, burnt taste from developing.
But, Why Soak Your New Coil?
E-liquid flavors, especially desserts or cocktails flavors, are a complex composition of various flavoring agents. The key to relishing the intricate flavors of these compounds is to keep your coil in the best health. Soaking new vape coils will help express the niche flavors of the liquid well to create a tasty and aromatic experience.
So, How Long Does A New Vape Coil Need To Soak?
Well, there is no golden rule for the right amount of time to soak or prime your coil. Vapers often disagree that there is a pre-fixed duration of soaking that offers the best performance.
How To Soak The Coil?
The slow soaking method is a consistent process that promises good results for the coil.
A Pre-Wash Also Helps
Washing your coil is the best way to eliminate gunk deposits on the surface that will reduce its efficiency. While most vapers follow the process for old coils, pre-washing new coils can also significantly impact the performance. Pre-washing improves the priming efficiency and is, therefore, a necessary step to prepare your new coil.
Conclusion
Soaking the vape coil in vape juice is a necessary step that prepares it before installation. It ensures a seamless path of e-liquid flow from tank to wick that reduces the chances of dry hits or burnt flavors.
How long do vape coils last?
This two-in-one part that contains both the heating element and the wicks doesn't last forever. Most don't last more than one - three months before it has either stopped firing or become 'scorchy', at which point a coil must be thrown out and replaced with a new one.
How to check if a coil is dry?
Finally, before you try out your freshly cleaned coil for the first time, check it for dryness. Hold it in your hand, tap it, touch the wick if you can. If the coil is completely dry, then it is safe to put back into use.
Why does sugary liquid make coils gummy?
But sugary e-liquid is the most notorious culprit. Because the coil elements heat up the liquid directly, the sugar in the mixture caramelizes directly onto the coils which causes them to become gummy and eventually stop working. So if your coil has failed or has become much weaker all too fast, try cleaning the coil before tossing it for a new one.
How to clean a deconstructed tank?
Use a paper towel or your first-hand towel to gently wipe down your coil, along with the other parts of your deconstructed tank. If you prefer, you can lightly damp the towel with water to help remove the oily e-liquid.
Is it safe to rinse with distilled water?
Distilled water is free of all minerals and other tiny particles that are normally in our tap water. Rinsing once more time with a cup of distilled water isn't actually a necessary step, but it can help you ensure that even the tap water doesn't leave any residue behind on your coils. If you happen to have distilled water or feel like experimenting to make your own, it's a good step to take.
Can you use isopropyl alcohol in a pen?
Really, anything clear, potable (can drink it), and potent will do. Never use isopropyl / rubbing alcohol. This can etch some of the materials used in the coil, tank, and pen construction.
Do vape coils burn out?
Sure, the vape brands sell them in packs but for an enthusiastic vaper, those replacement costs can become noticeable. Fortunately, coils don't actually burn out as often as we think they do. In some cases, your heating coils may have simply gotten dirty. Dirty coils can happen or about half a dozen different reasons.
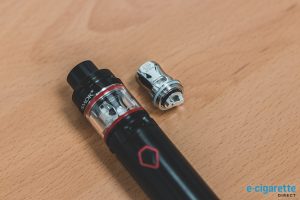
What is a vape coil?
A vape coil is a cylindrical device that contains the atomizer wire and wick in one piece. The atomizer coil itself is made of metal. The most common type of metal used is Kanthal. Although other metals such as stainless steel or nickel are used for temperature control vaping. The metal coil resembles a coiled spring.
What is the resistance of a vape coil?
The most common types of vape coils are: Sub ohm vape coils – atomizer resistance is less than 1.0 ohms.
What is the best vape tank?
The best quality vape tanks, found at Mig Vapor, are precision engineered and the coils thread easily into place. Once the coil is inserted, place a couple of drops of e-liquid through the top opening of the coil directly on to the cotton material.
How to prime a sub ohm coil?
To prime a sub ohm atomizer coil, the first thing to do is insert the new coil into the base of the vape tank. The best quality vape tanks, found at Mig Vapor, are precision engineered and the coils thread easily into place.
What happens if you don't prime your vape coil?
If a coil is not properly primed, the first vape could potentially fry the coil and for sure get an unpleasant burnt tasting vape. In addition, the coil will likely be ruined and require replacement. Ruining a new vape coil on the first vape equates to money down the drain.
Why is vape wick saturated?
First, the vape wick replacement is saturated to avoid a burnt taste or cause coil damage. Next, the coil life is extended. Overall, coil life will be affected by how much you vape and the wattage. The idea is to get the most coil life you can because that’s money!
What is the wick on an atomizer made of?
As you can see in the image above the atomizer coil is surrounded by wick. The wick is usually made of organic cotton although other fibers such as bamboo can also be used. The coil and wick are in direct contact. If the wick is dry and the coil is heated, the cotton will burn.
How long do you have to wait to vape?
All you got to do is wait around for your coils to warm up all by themselves. The disadvantage of this method is that one must wait for about 20 minutes before they can start vaping.
How to break in a new coil?
This is the fastest way to get break-in your new coils. So how does this method work? First, you must start by creating a vacuum. This will see to it that the wicking material takes up the e-liquid faster. Once you have properly set your new coils, block the air inflows. This will ensure that no air gets in. Next, start taking some dry hits. When doing so, do not power your battery. Perhaps, the reason why this method is also referred to as the No Power Method. Take a maximum of five dry hits, all while checking not to flood your coils or get the juice into your mouth.
Why do I shake my vape?
After that, start shaking the vaping device as hard as you can. The reason for this is to create air bubbles. This method works under the assumption that the air bubbles created will help to push up the liquid faster. This is also among the very fast methods of getting your coils primed.
Why do you need to prime your coils?
Therefore, you need to prime the coil and ensure that your wicking material is saturated. This will prevent the coils from burning your cotton wool, once hot, hence, preventing burnt flavors. Breaking-in your coil is also important in improving the lifespan of your coils and as well as intensifying your flavors.
