Here are the steps: 1. Press the button rapidly 5 times 2. Notice the light on the button flashing 3. The battery is now activated, you can push and hold the button as you're inhale your vape.

How to turn on a vape pen?
HOW TO TURN ON A VAPE PEN . To turn on a vaporizer pen, press the button 5 times rapidly. A light will typically appear or flash to indicate it is on. Once it is on, it’s ready for use. If your vape pen is button activated, simply hold down the button as you draw from the mouthpiece of your cartridge.
How to use a vape in boost mode?
When it’s ready to vape, the light will turn green. Double-click the button to activate boost mode and increase the set temperature to 383° F, and triple-click it to finish things off at 410° F.
How do I charge my vape plus?
As with any brand new vape, let’s charge it up before its first use. Take your Plus and unscrew it right above the button to reveal the charge connection. Screw the bottom half of your Plus (the battery) onto the USB Charger. A full charge will take roughly 30 minutes, and should last around 50 hits.
How do I turn the battery on/off on my vape?
Press the button rapidly 5 times 2. Notice the light on the button flashing 3. The battery is now activated, you can push and hold the button as you're inhale your vape. 4. Rapidly click the button 5 times to turn the battery off. If playback doesn't begin shortly, try restarting your device.
How do you use a vape plus pen?
Vape pens work in a very straightforward way.First, you will power on the device, usually by clicking the power button five times. ... Then, you will press and hold the power button. ... Once you have vaped your fill, you will press the power button five times to turn the device off.
What do the buttons on a vape do?
The pressing of the button signals to the battery that it needs to provide power to the heating element, or coil, so that it can heat up to turn the product inside the chamber (oil, wax, etc.) into vapor. Simply pulling on the mouthpiece will not produce any vapor with this type of device.
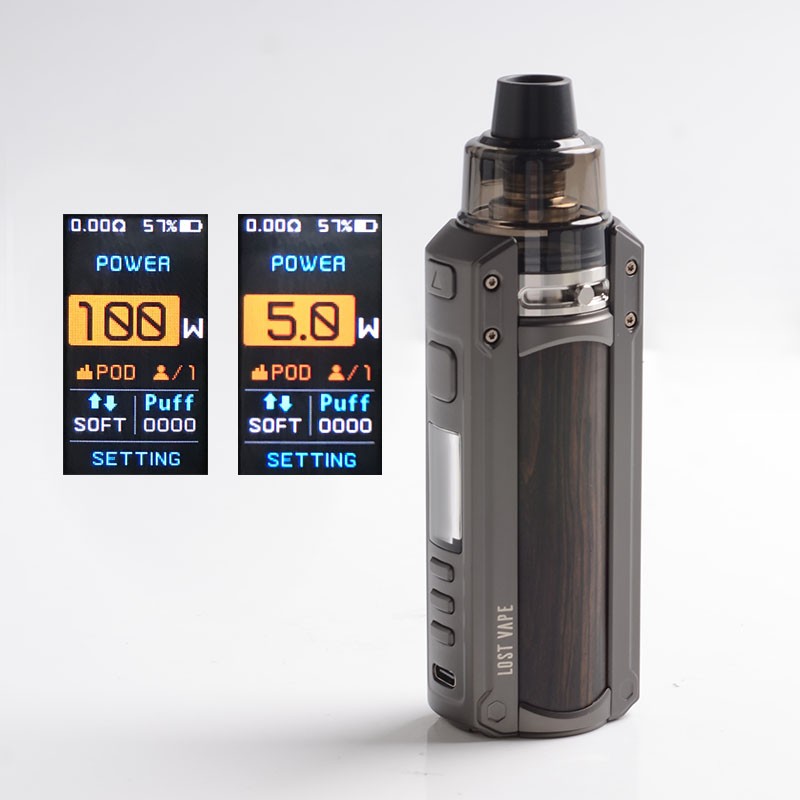
How do I adjust my vape settings?
1:503:08How to setup your Mod Kit? - YouTubeYouTubeStart of suggested clipEnd of suggested clipHowever if you're using a suburb device a coil of 1.0 ohm and under you need a thicker liquid weMoreHowever if you're using a suburb device a coil of 1.0 ohm and under you need a thicker liquid we recommend a 70 30 ratio as the device is more powerful if you use 50 50 liquid in a sub-ohm.
Do you hold button while vaping?
The settings ranging from low to high are all automatic draw activated puffs, but the dab mode (blue lights) requires you to hold down the power button during the inhale. The first three settings are perfect for those who want to vape without having to press a button, and will vape THC cartridges by simply inhaling.
How long does it take to charge a vape?
Take your Plus and unscrew it right above the button to reveal the charge connection. Screw the bottom half of your Plus (the battery) onto the USB Charger. A full charge will take roughly 30 minutes, and should last around 50 hits.
How to test a plus heater?
Screw the Plus back together and rapidly click the button five times to turn it on. Double-click to engage the heater into session mode and let it run until it times out, twelve seconds later. While it’s heating, blow into the heater to see if hot air bounces back at you. If it’s heating up, you’re good to go.
What is puffco plus?
The Puffco Plus is the Peak ’s ultraportable little brother. If you’re unfamiliar with dab pens or concentrates in general, then take a look at this Quickstart guide to get up to speed with your Puffco Plus.
How to use a vape pen?
If you are brand new to using a vape pen, it’s easy! Simply press the button on your battery, and inhale while drawing vapor from the mouthpiece. With an inhale activation battery, you won’t even need to press a button. Over time, you will learn what works best for you.
How to turn on a vaporizer pen?
To turn on a vaporizer pen, press the button 5 times rapidly. A light will typically appear or flash to indicate it is on. Once it is on, it’s ready for use. If your vape pen is button activated, simply hold down the button as you draw from the mouthpiece of your cartridge. You’ll want to make sure you vaporizer battery is charged ...
How long does it take for a vape battery to change colors?
It usually takes 2-3 rapid clicks of the button on your battery for the light to change colors. Each vape is different, so check your user guide to learn your specific voltage settings. If you ever have a question on your battery, you can always reach out to the friendly team over at VPM for support.
Do you need a top airflow cartridge for vaping?
If the answer is yes, you have a top airflow cartridge. These are a little less common, but they will only work on button activated batteries. 3. Charging your Battery. Charging your battery is crucial to your vaping experience. Most vapes will either use a Micro USB charger, or come with a vape pen charger.
Do vape batteries need to be charged?
Many vape batteries come somewhat charged, but we recommend charging before use to get the most out of your vaping sessions. Once your vape pen is on, there are two different ways you could activate the batteries: Inhale activation & Button Activation.
Do vapes need a charger?
Most vapes will either use a Micro USB charger, or come with a vape pen charger. VPM carries Vape Pen Chargers if you ever misplace yours, or if you just like to have extras around. Batteries will generally light up once they are plugged in indicate they are charging.
Already charged, top it off
Storz & Bickel ships the Crafty+ with the battery already charged to 80 percent, but we recommend plugging it in and charging it up the rest of the way before use. It normally takes one and a half hours to fully charge from empty, so it shouldn’t take long to top it off the first time around.
Time for a burnoff
Like a lot of vaporizers, we recommend running a burn-off cycle before use to make sure there’s no residue left over from manufacturing or shipping. Turn on your Crafty+, triple-click the button so that it flashes red quickly, and let it run until it shuts off on its own.
The cooling unit
The Crafty+ uses a removable cooling unit to make sure that every hit is as smooth as the last. Twist it 90 degrees counterclockwise to unscrew it from the vaporizer, exposing the oven underneath.
One button operation
The Crafty+’s compact size doesn’t leave room for a display, or full controls. Instead, the Crafty+ uses a single button to control its basic functions. Click the button once to turn it on and start heating up, as indicated by the solid red LED. When it’s ready to vape, the light will turn green.
Grind your herbs
We recommend using medium ground herbs with your Crafty+, although any grind will do, including whole herbs. If you want a finer grind with your three or four piece grinder, turn the grinder upside down so the herbs grind for a little longer than they would normally.
Cover the oven
When loading your oven, you want to pack it down just lightly, but ensure that the whole width of the oven is covered, so that the air has to pass through the herbs, and can’t go around. If you can’t fill the oven completely, put the included concentrate pad on top of a small amount of herbs, to take up the rest of the space.
No settings, just go
For your first session, go ahead and fire up the Crafty+ on its default heat setting, which should be a good temperature for most people. Wait until it vibrates and the light turns green, then hit it. When it stops producing a satisfying amount of vapor, either double click the button to put it into boost mode, or turn it off if you're done.
Plug it in
Your new Mighty+ will arrive just shy of a full charge, so we recommend you plug it in and top it off before we move into our first session. Plug it in with the included USB-C cable and wait for the battery indicator to turn solid.
Simple controls
The Mighty+ vape comes with one of the easiest control setups on the market. From precise temperature settings to battery level, the Mighty+ has everything displayed on a bright LED display, no bluetooth app necessary. A single power button turns it on and off, and two arrow shaped buttons control temperature down to the single degree.
Run a burnoff cycle
Once your Mighty+ vape is fully charged, let’s run a burnoff cycle to cleanse the bowl and heater of any leftover residue from the manufacturing process. Press the power button on the side to turn it on, and then use the orange arrow buttons to set it to the highest temperature setting, 410° F (210° C).
Grind and pack
The Mighty+’s hybrid mix of conduction and convection heating is versatile enough to handle any type of grind, but thrives with a medium to medium-fine grind. Just about any grinder will suffice, so grab whatever you’ve got and grind up your herb of choice.
Set the temperature
For this first session, we’ll lean on the side of flavor with enough vapor production to satisfy. Turn your Mighty+ on and set the temperature to 385° F (196° C). When it vibrates, it’s ready to go!
Hit it!
One of the Mighty+’s best qualities is its ability to keep up with any type of hit. Whether you’re a steady sipper, or a hard hitter, the Mighty+ vaporizer will keep up. We’ll sit somewhere in between for this session, so swivel the mouthpiece around and give it a slow but consistent draw.
Clean up
When you’re all finished with your session, grab the included cleaning brush and clear the oven and the bottom of the cooling unit of all spent material. It’s best to do this while the oven is still warm to prevent tough buildup. And that’s it! We’ll release a full cleaning guide soon to walk you through the deep cleaning process.